Come impostare Google Analytics
Google Analytics viene utilizzato per visualizzare e comprendere il traffico web.
È gratuito e facile da usare.
Puoi personalizzarlo per molti casi d'uso.
Funziona fuori dagli schemi.
È veloce da configurare. Ottieni le tue intuizioni oggi!
Crea il mio sito web gratuito ❯Salta la lettura di Google Analytics. Portami direttamente al primo passo. Vai al primo passaggio
Cos'è Google Analytics
Google Analytics è una soluzione di analisi web.
È sviluppato e supportato da Google.
L'ultima versione si chiama Google Analytics 4.
Può essere utilizzato per visualizzare dati come pubblico, visualizzazioni di pagina, sessioni e dati demografici ed eventi.
Perché abilitare Google Analytics
Comprendi il tuo traffico web per prendere decisioni migliori.
Comprendere e migliorare il funnel di vendita.
Impara dalla sperimentazione (ad esempio, test a/b).
Google ha un'altra soluzione chiamata Google Optimize. Questa soluzione è fatta per i test.
Per chi è Google Analytics
Google Analytics è utile per chiunque abbia un sito web.
Ti fornisce informazioni su chi utilizza il tuo sito e su come interagiscono con esso.
Inoltre, l'interfaccia è facile da capire.
Non è necessario un background di analisi per utilizzare e navigare nel servizio.
Come impostare Google Analytics passo dopo passo
Google Analytics può essere impostato in due modi : Global Website Tag (gtag.js) o Google Tag Manager .
Il modo più semplice è utilizzare il tag globale del sito web.
Questo tutorial utilizzerà l'approccio The Global Website Tag.
Preparativi
Decidi quale editor di codice utilizzare e configura il tuo ambiente.
W3Schools ha creato un editor di codice facile da usare chiamato W3Schools Spaces . Iscriviti e inizia in pochi clic.
Inizia gratis ❯Crea il tuo file index.html in modo da essere pronto per inserire il codice.
Tutta la configurazione. Andiamo!
Imposta Google Analytics: il tag globale del sito web
Passaggio 1: crea un account Google Analytics
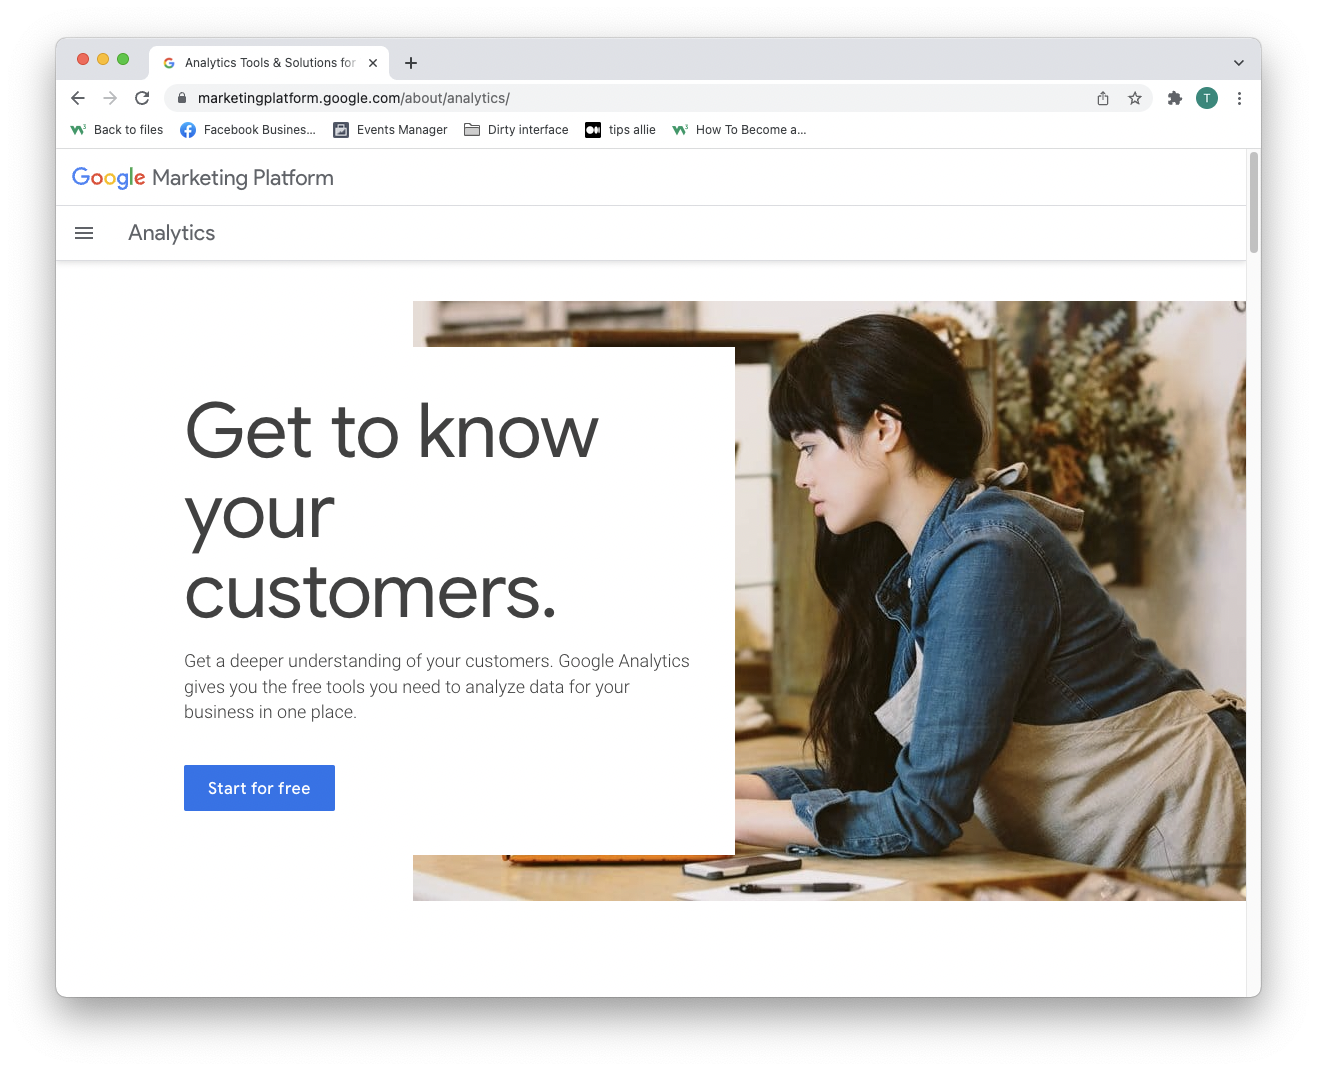
Vai ad Analytics: crea un account o accedi ad Analytics
Il link nel paragrafo precedente porta alla pagina di destinazione di Google Analytics.
Fai clic sul pulsante "Inizia gratuitamente".
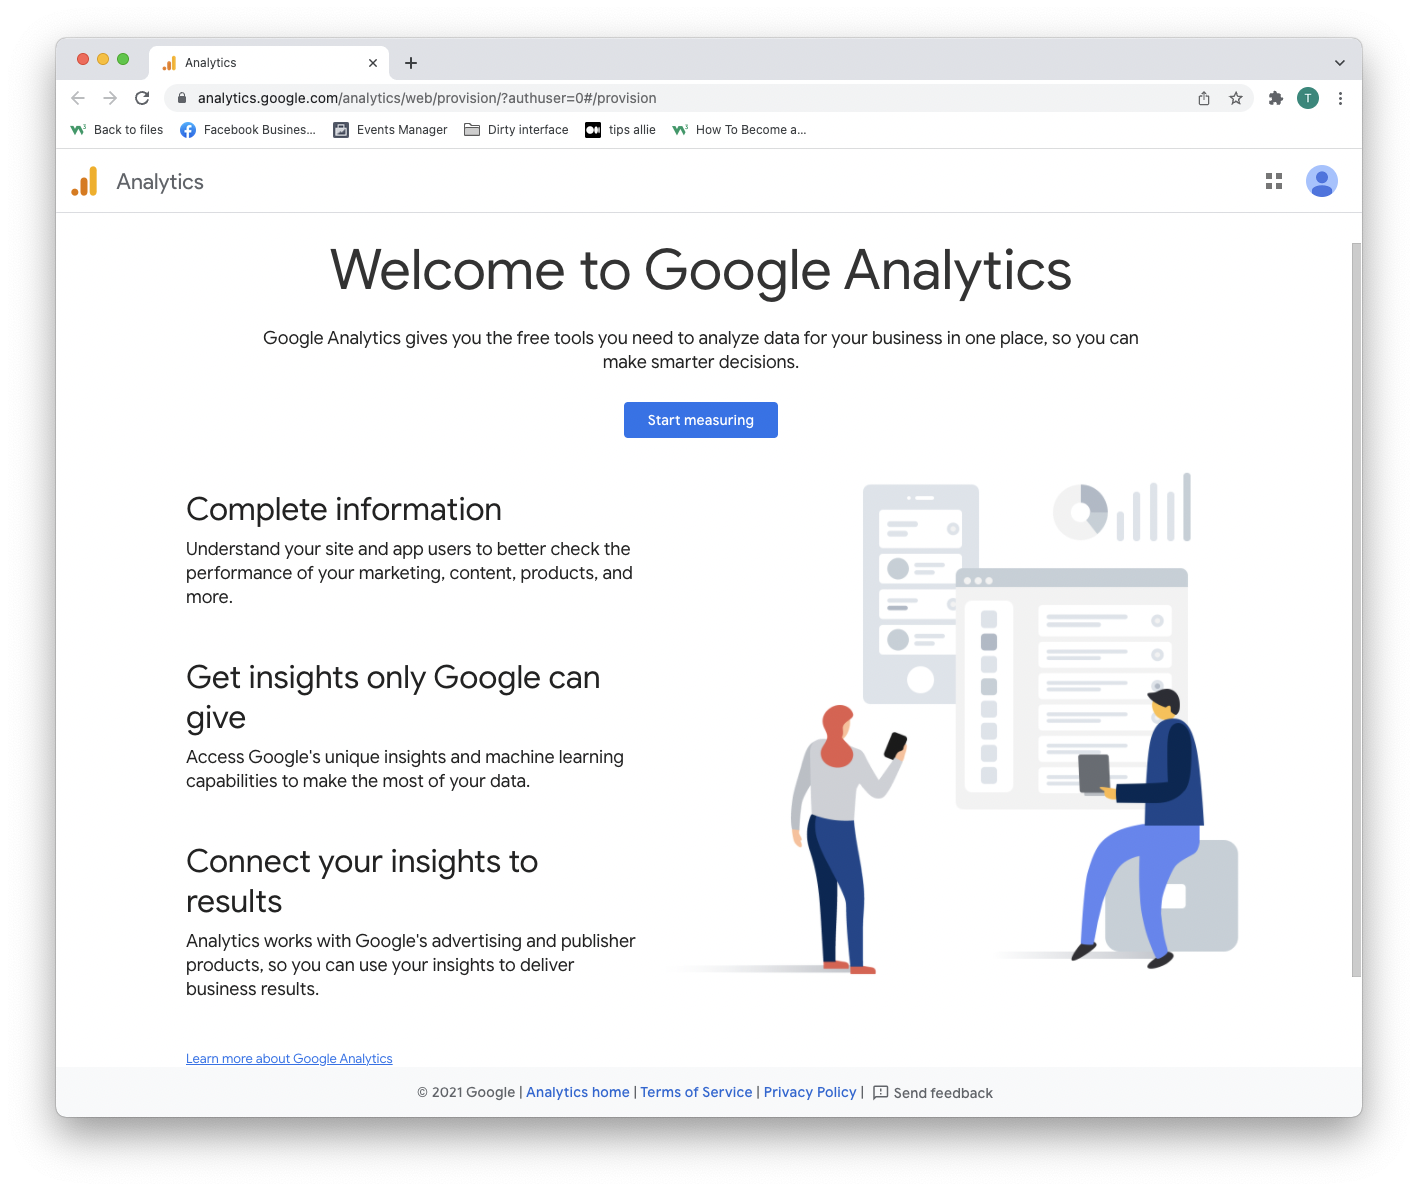
Passaggio 2: accedere alla pagina di benvenuto
Dopo aver creato un account o aver effettuato l'accesso, sei il benvenuto nella soluzione.
Premere il pulsante "Inizia misurazione" per procedere.
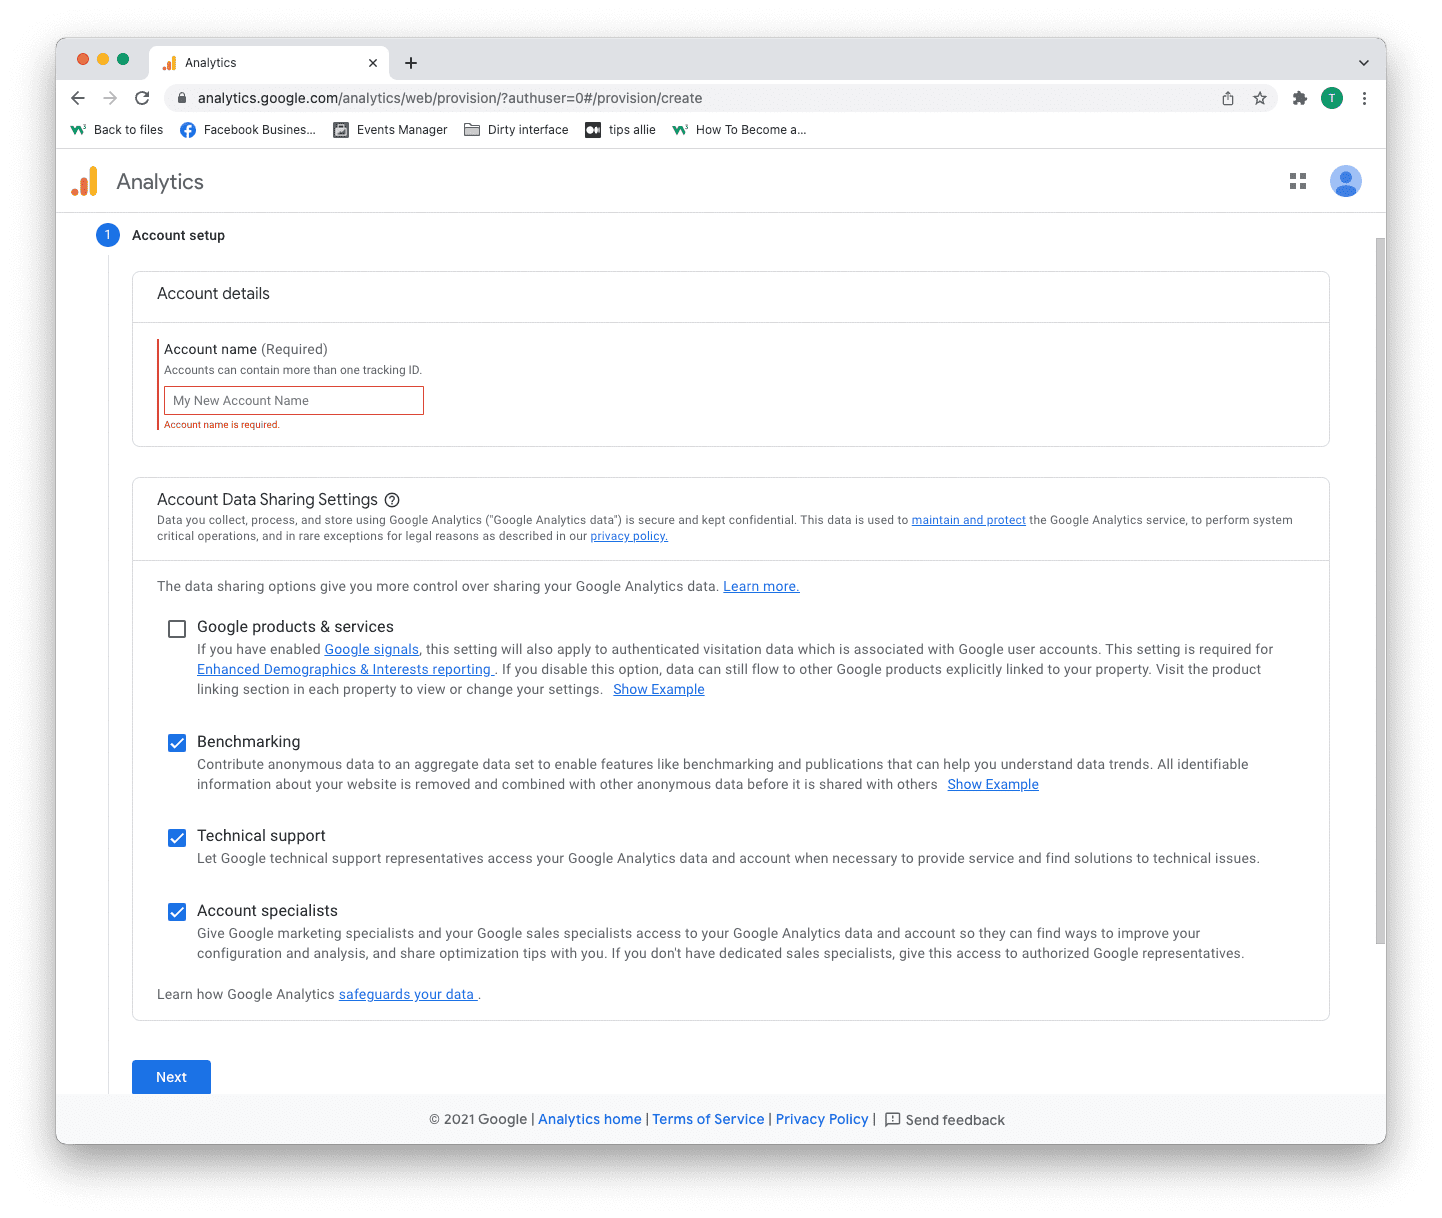
Passaggio 3: configurazione dell'account
Hai due decisioni da prendere qui.
- Inserisci il nome del tuo account.
- Decidi quali dati vuoi condividere.
- Fare clic sul pulsante "Avanti".
Un account può avere più di un ID di monitoraggio. Puoi monitorare più di un sito Web con un account.
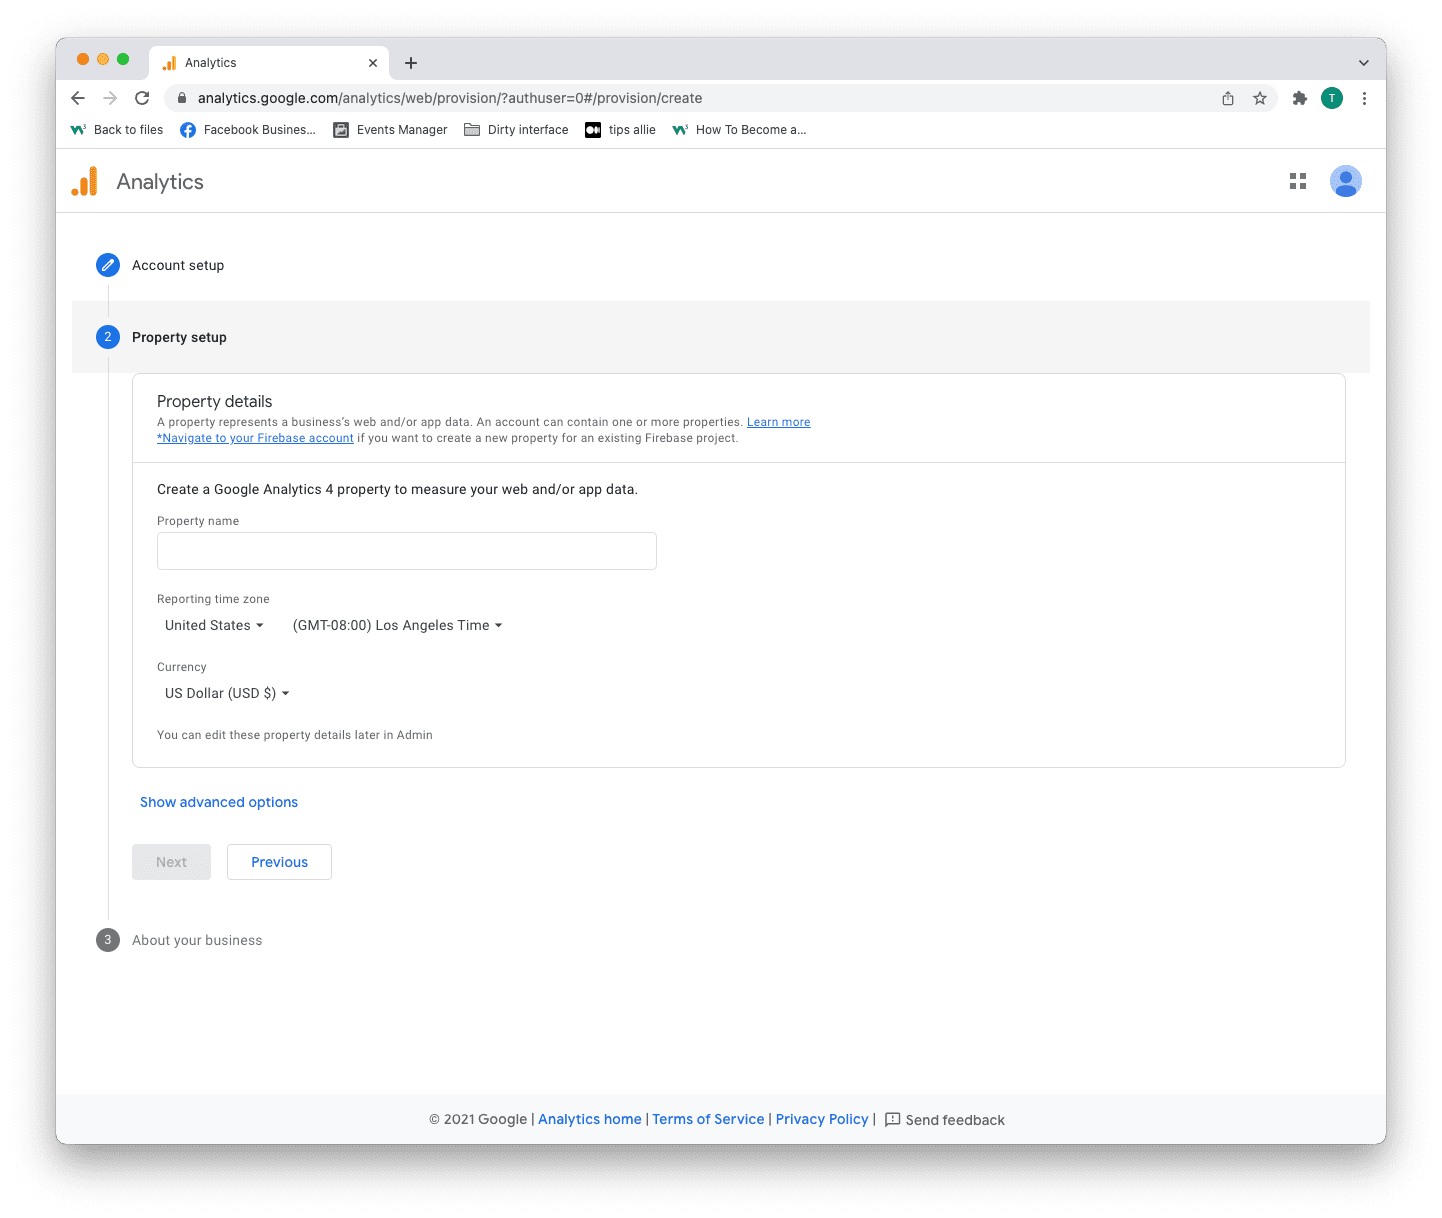
Passaggio 4: configurazione della proprietà
La proprietà è il servizio che misuri, come un sito Web, un'applicazione, un albero dei collegamenti, ecc.
- Immettere un nome di proprietà.
- Inserisci il tuo fuso orario.
- Inserisci la valuta che usi.
- Fare clic sul pulsante "Avanti".
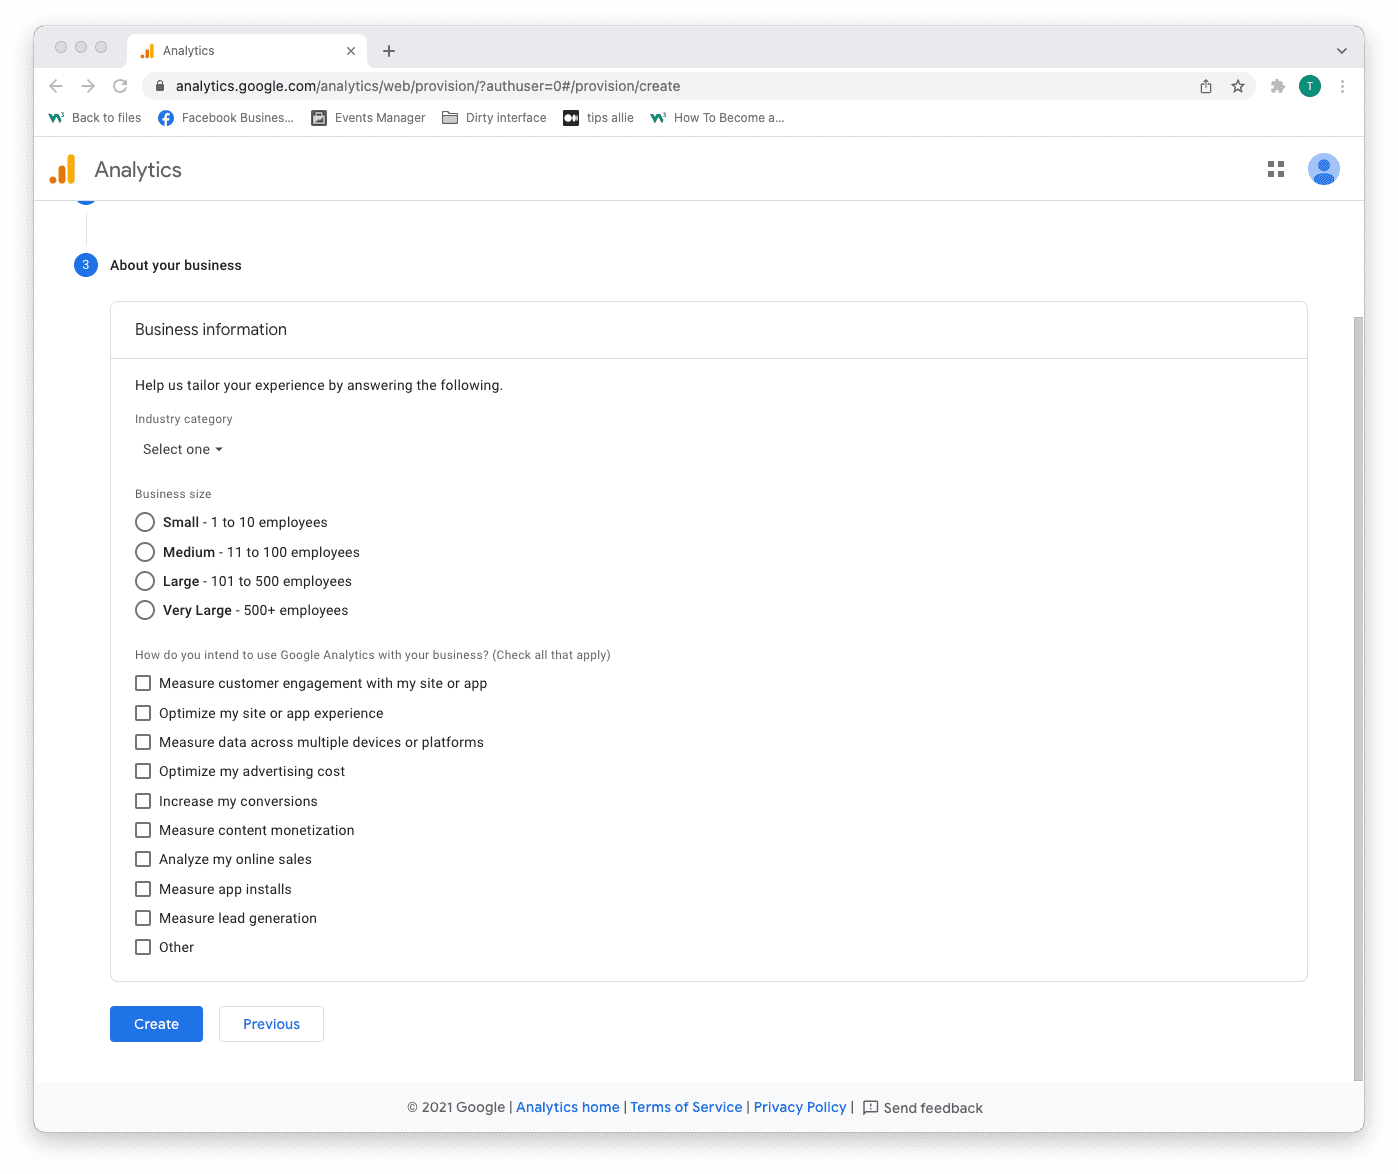
Passaggio 5: aggiungi informazioni sull'attività
Analytics utilizza le informazioni per personalizzare la tua esperienza.
- Seleziona la categoria del tuo settore.
- Seleziona la dimensione dell'attività.
- Tick the boxes for how you are planning to use Analytics.
- Click the "Create" button to proceed.
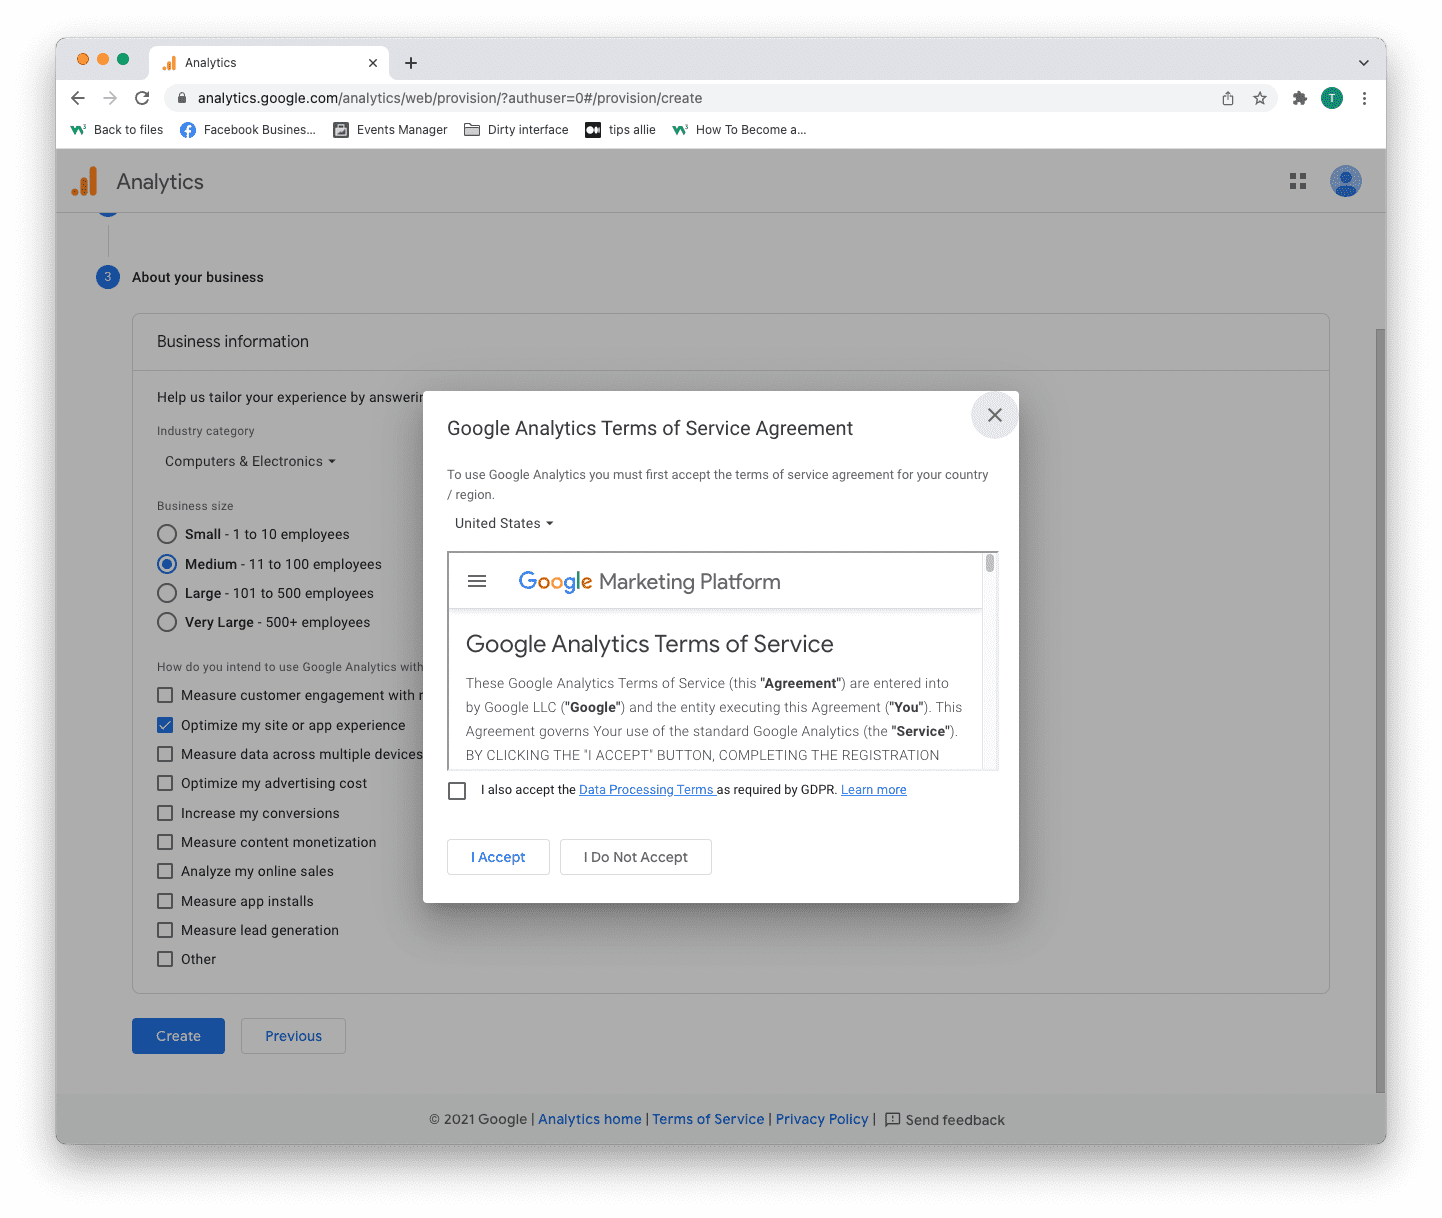
Step 6: Terms of Service Agreement
Read and understand the terms of service.
Tick the GDPR box and click the "I accept" button if you agree.
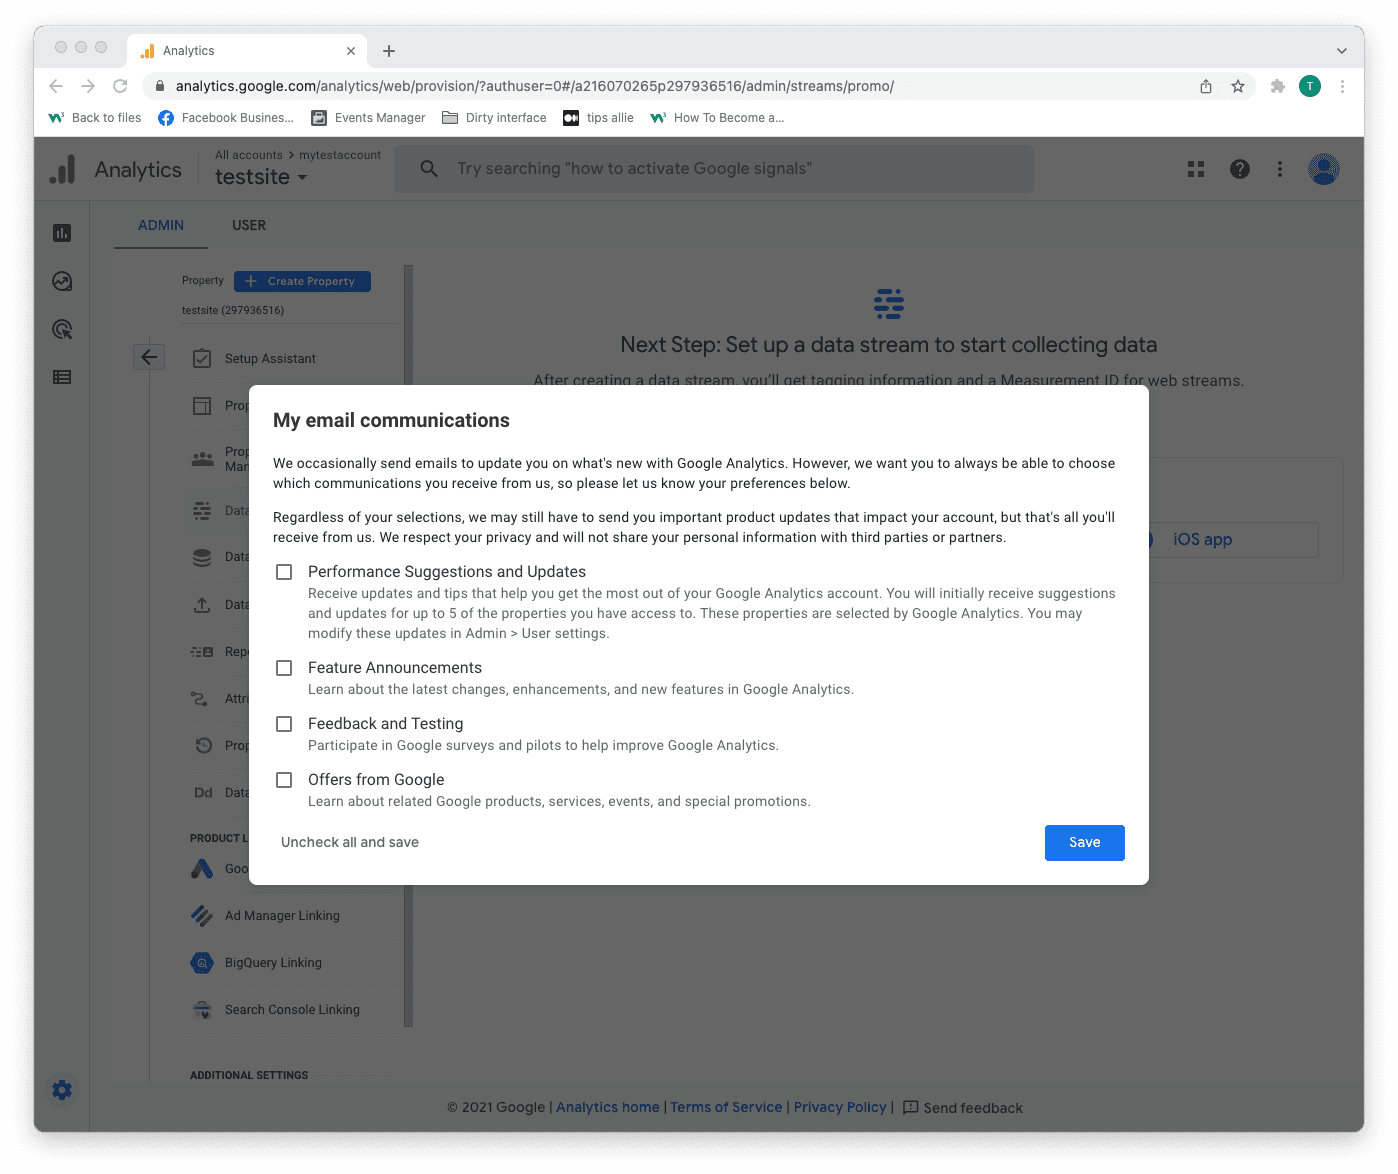
Step 7: Email subscriptions
- Tick or uncheck all boxes.
- Click the "Save" button to continue.
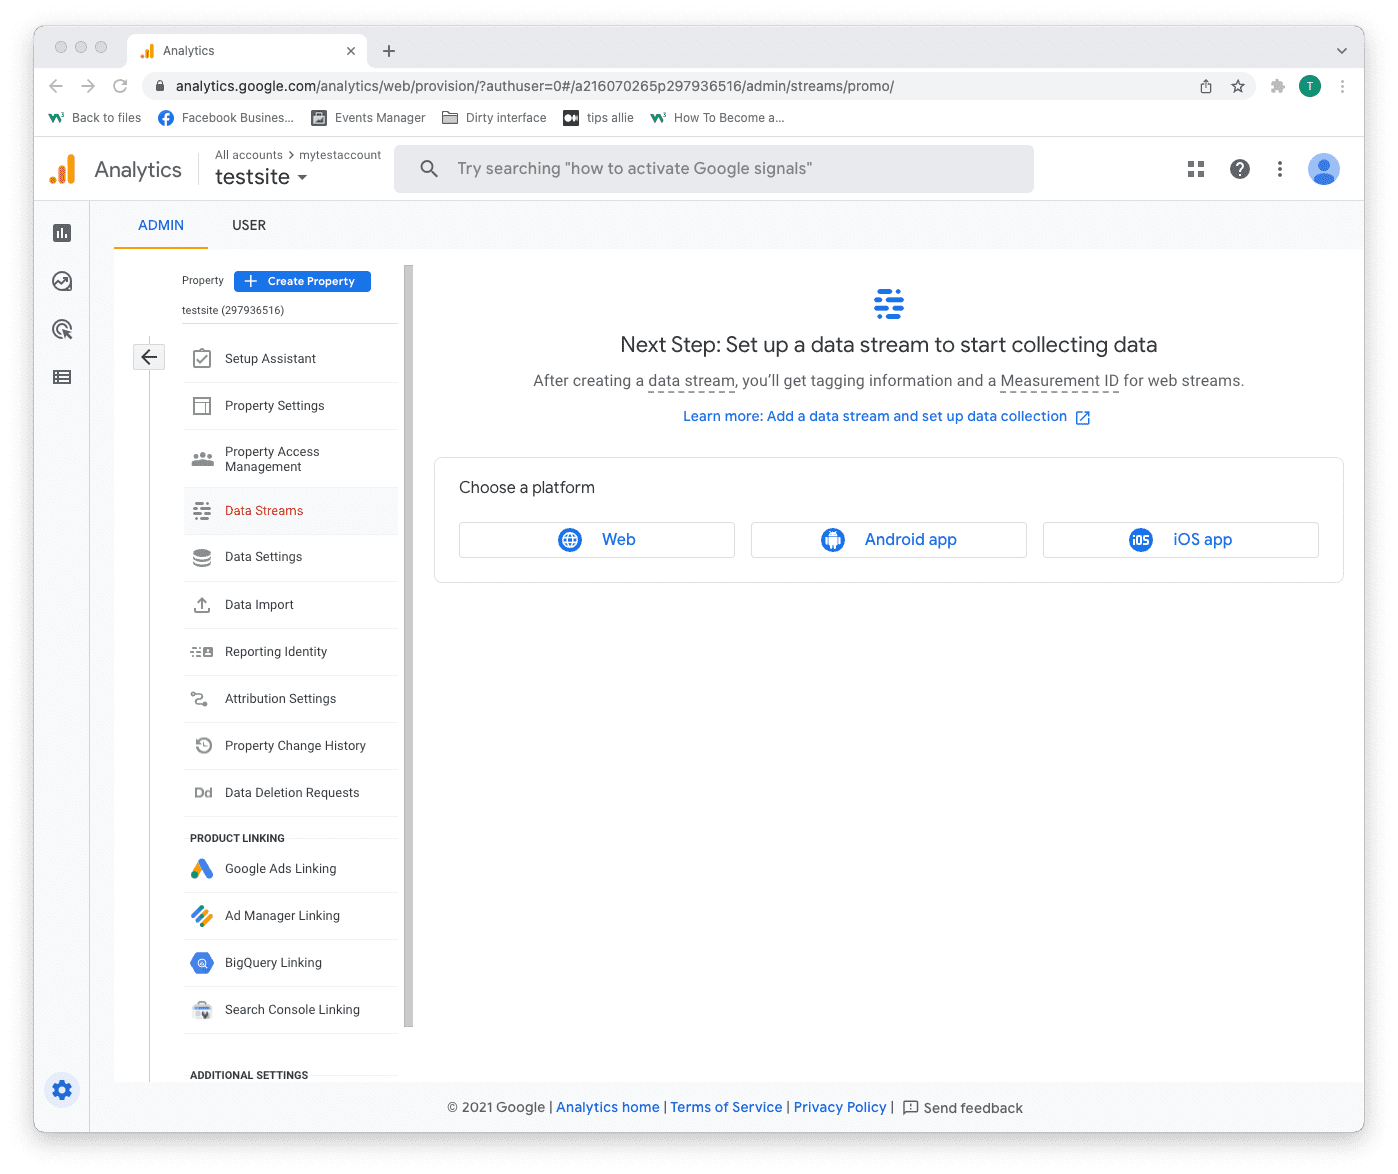
Step 8: Select platform
Chose the platform where you are collecting data.
Then, click the relevant platform to continue.
We are continuing with "Web" as the example in this tutorial.
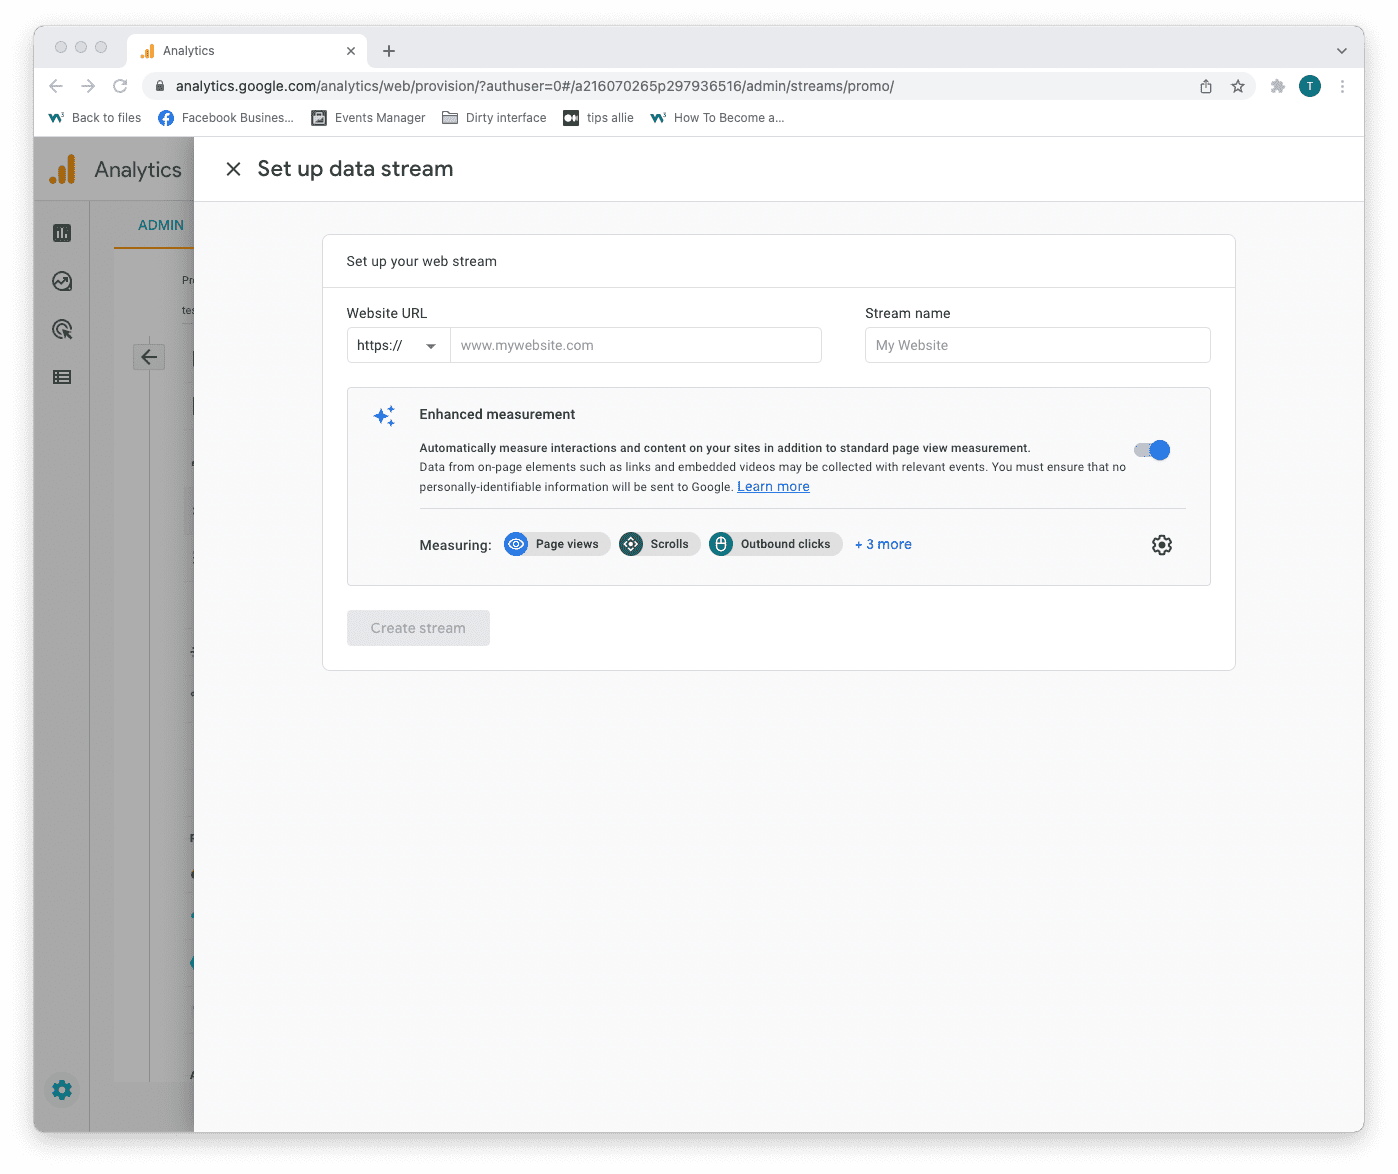
Step 9: Data stream setup
Enter data stream details.
- The URL to your site.
- The name that you want to give the stream.
- Decide if you are to enable enhanced measurement or not.
- Click on the "Create stream" button to continue.
The enhanced measurement can give the data more context. Improving your understanding of the traffic.
Step 10: Web stream overview
Here you can see a detailed overview of the web stream.
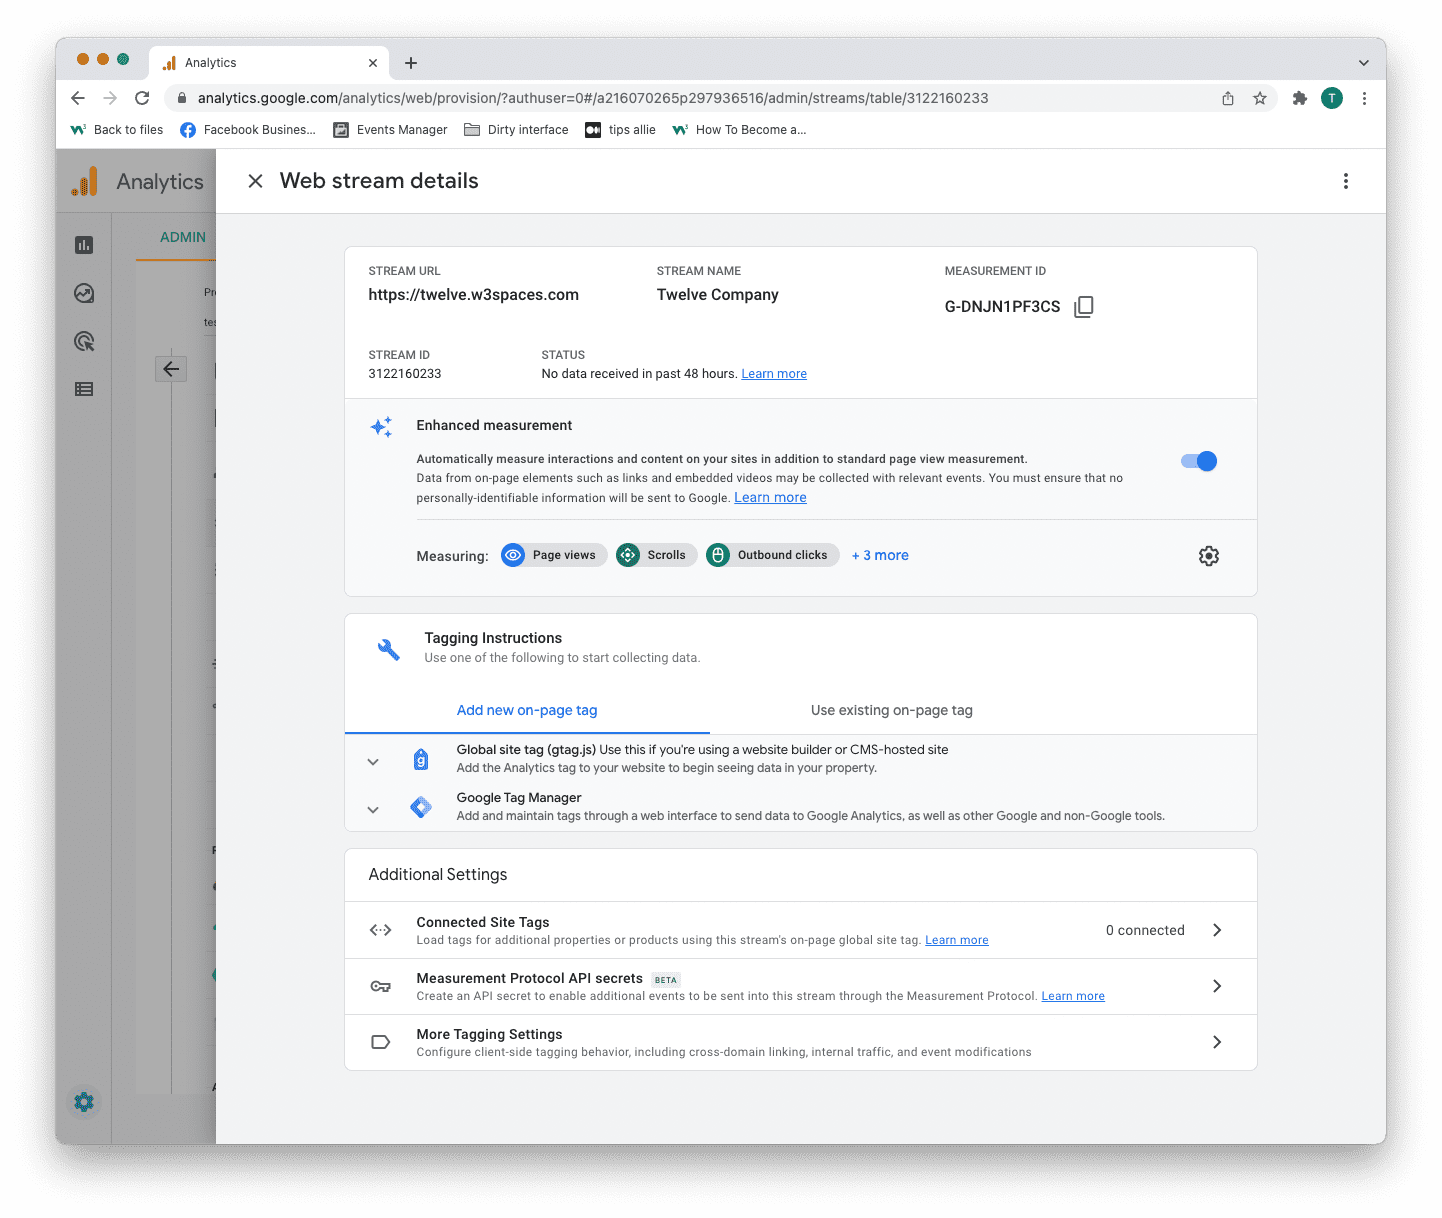
Here are the key takeaways from the overview.
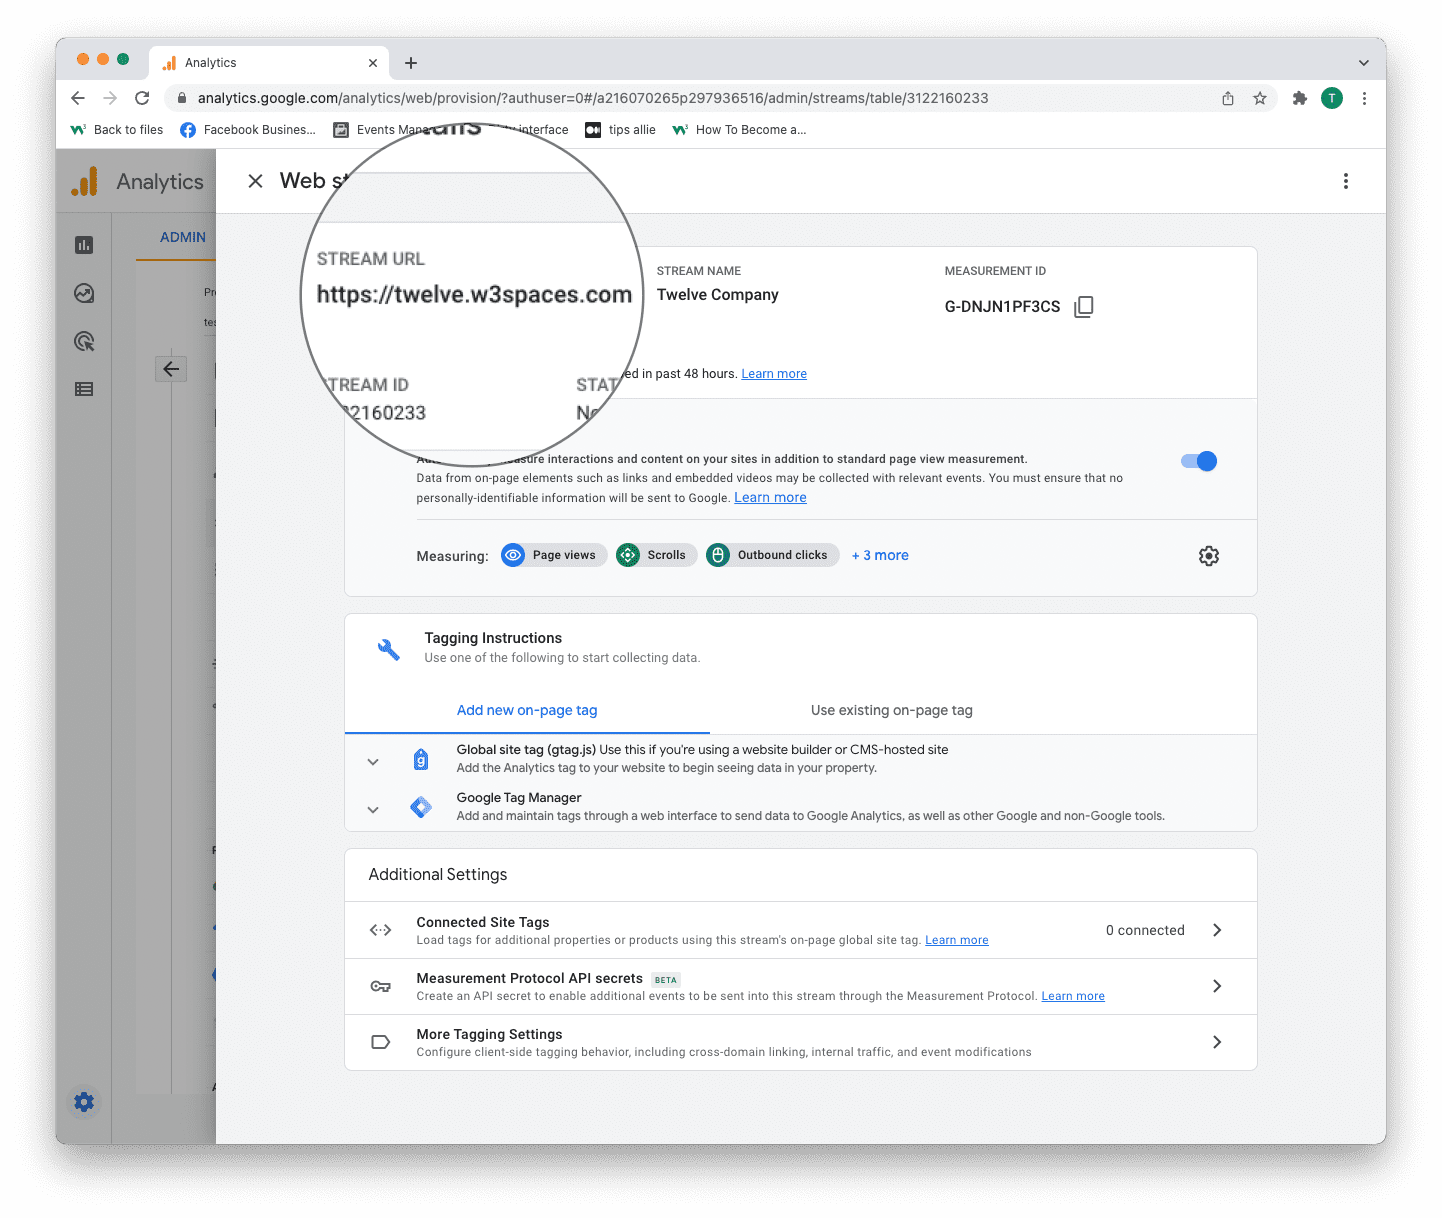
1. Stream URL.
The Stream URL is the link to the connected site.
2. Measurement ID
The Measurement ID is the identifier for your data stream.
It has a format of G-XXXXXXX.
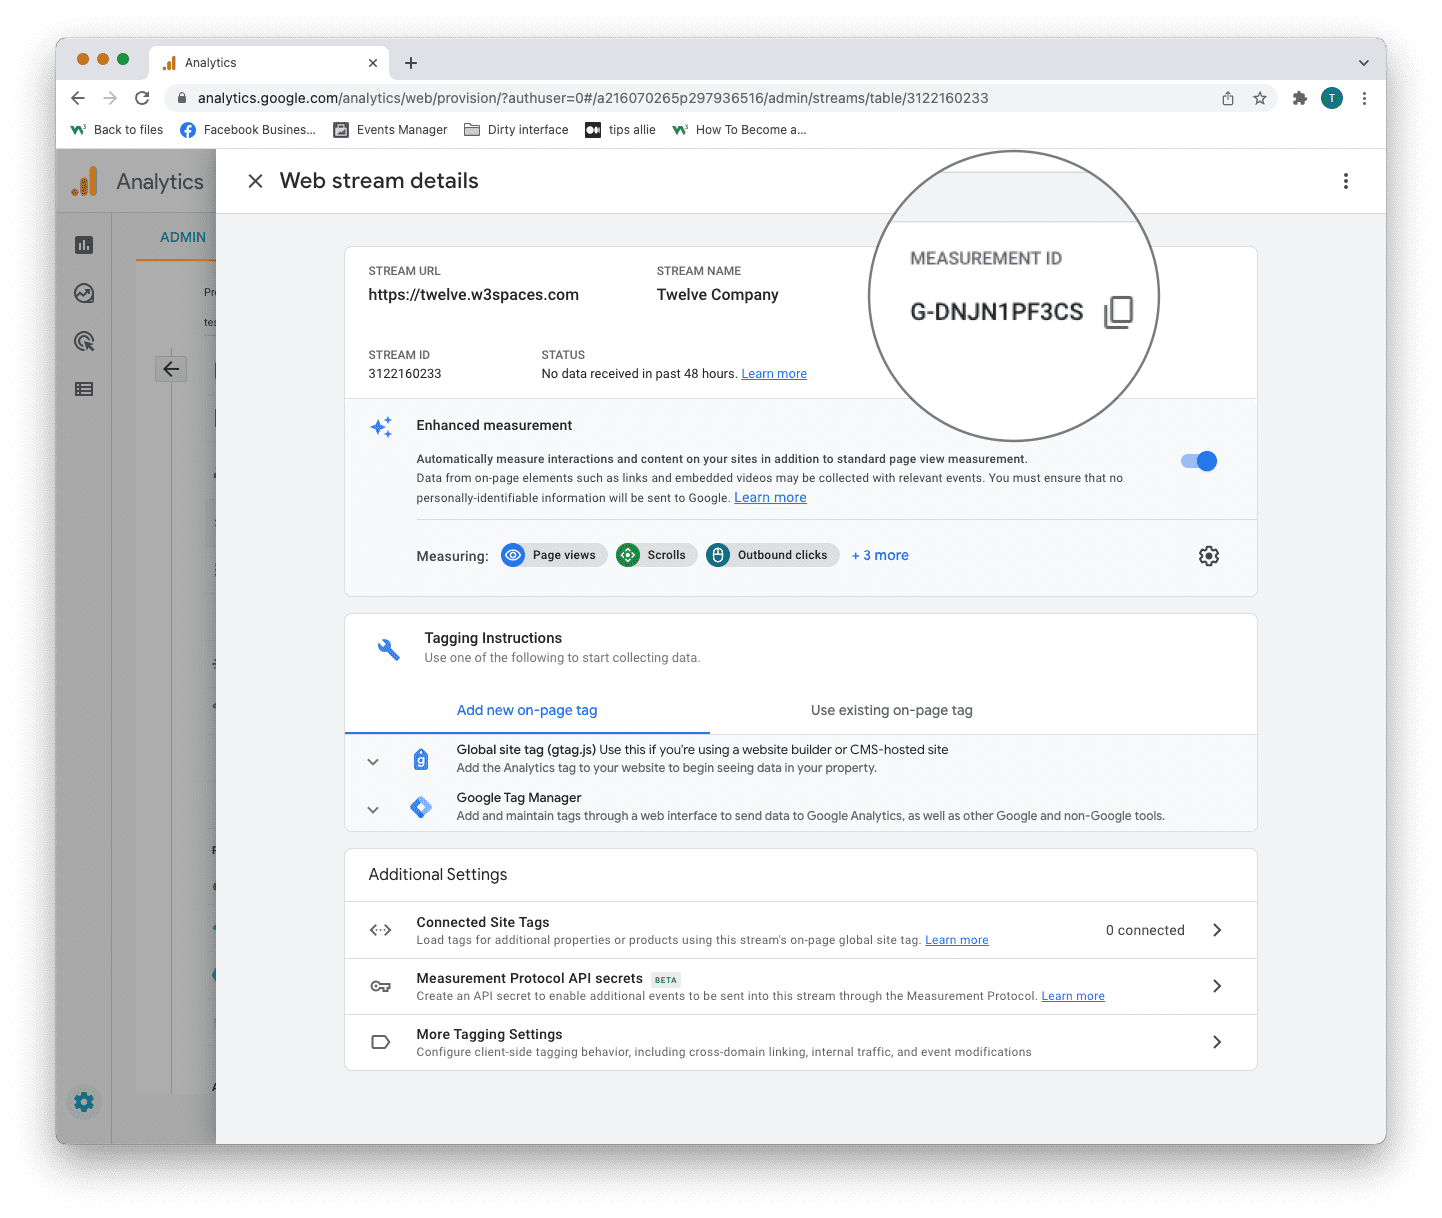
Google Analytics 4 uses Measurement ID. Older versions use Tracking ID. You can not have both.
3. Tagging instructions
Decide to use Global site tag (gtag.js) or Tag manager.
This tutorial will use the Global site tag.
Installing the Global site tag is the easiest and quickest way of getting it up and running.
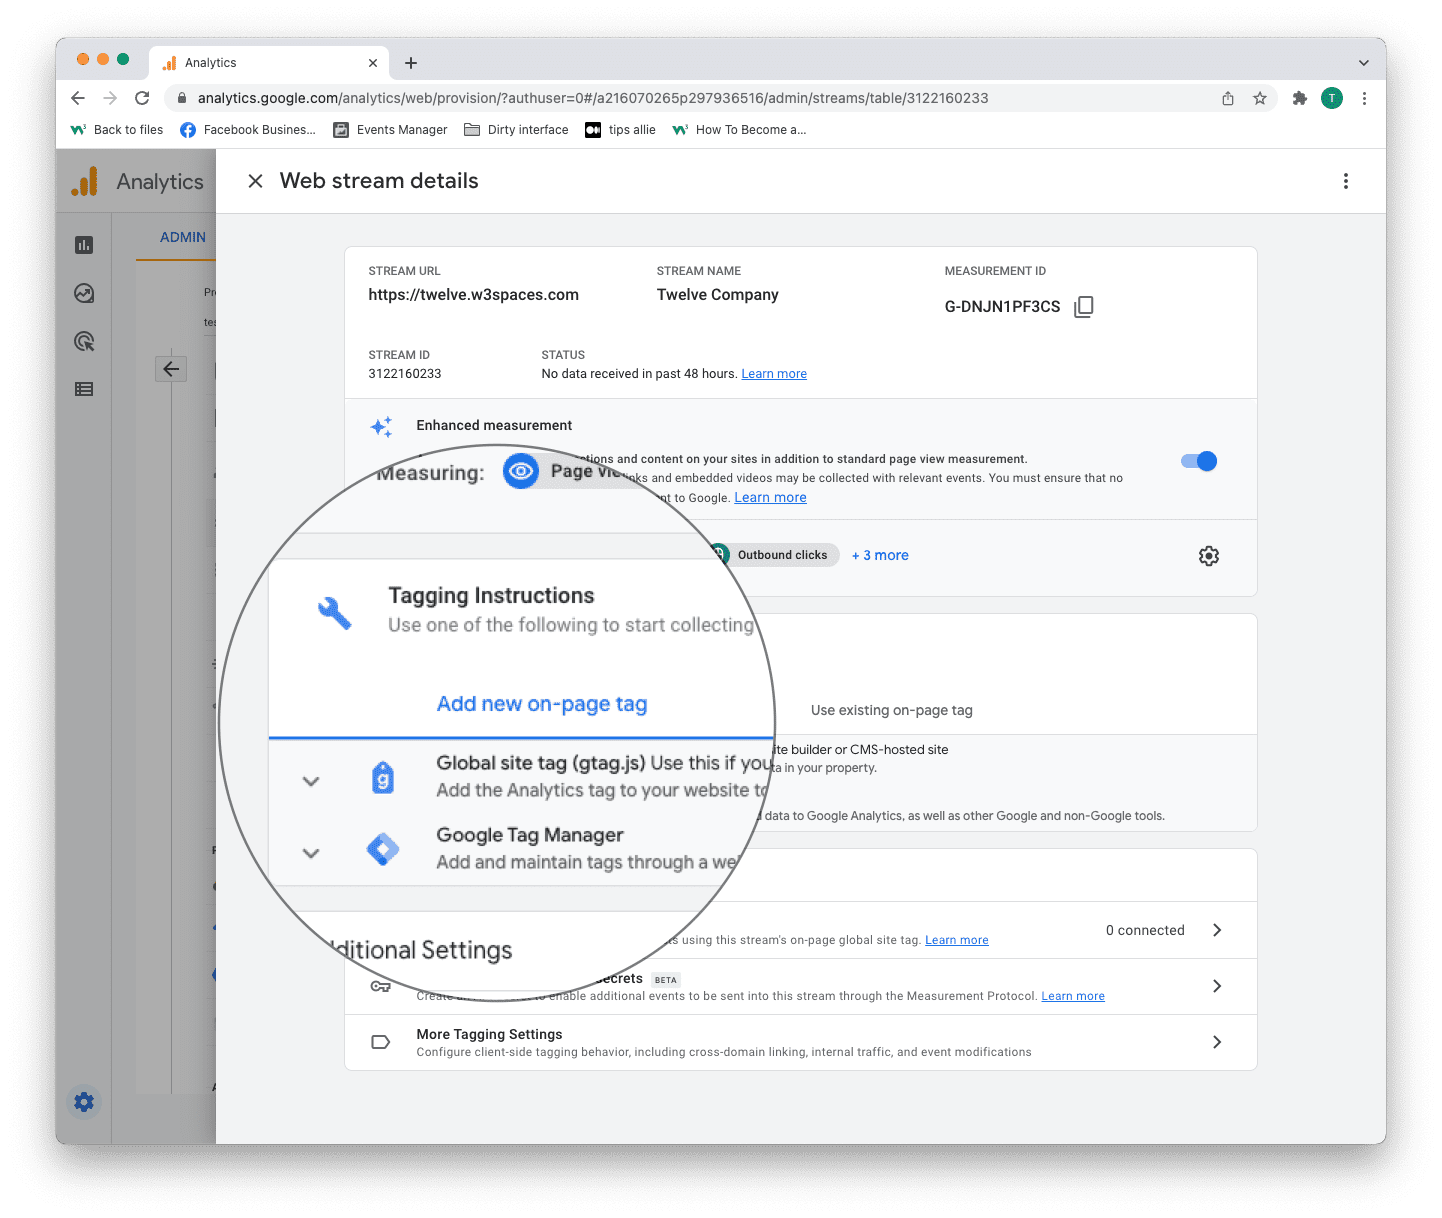
Step 11: Global site tag (gtag.js)
Click the "Global site tag (gtag.js)" row.
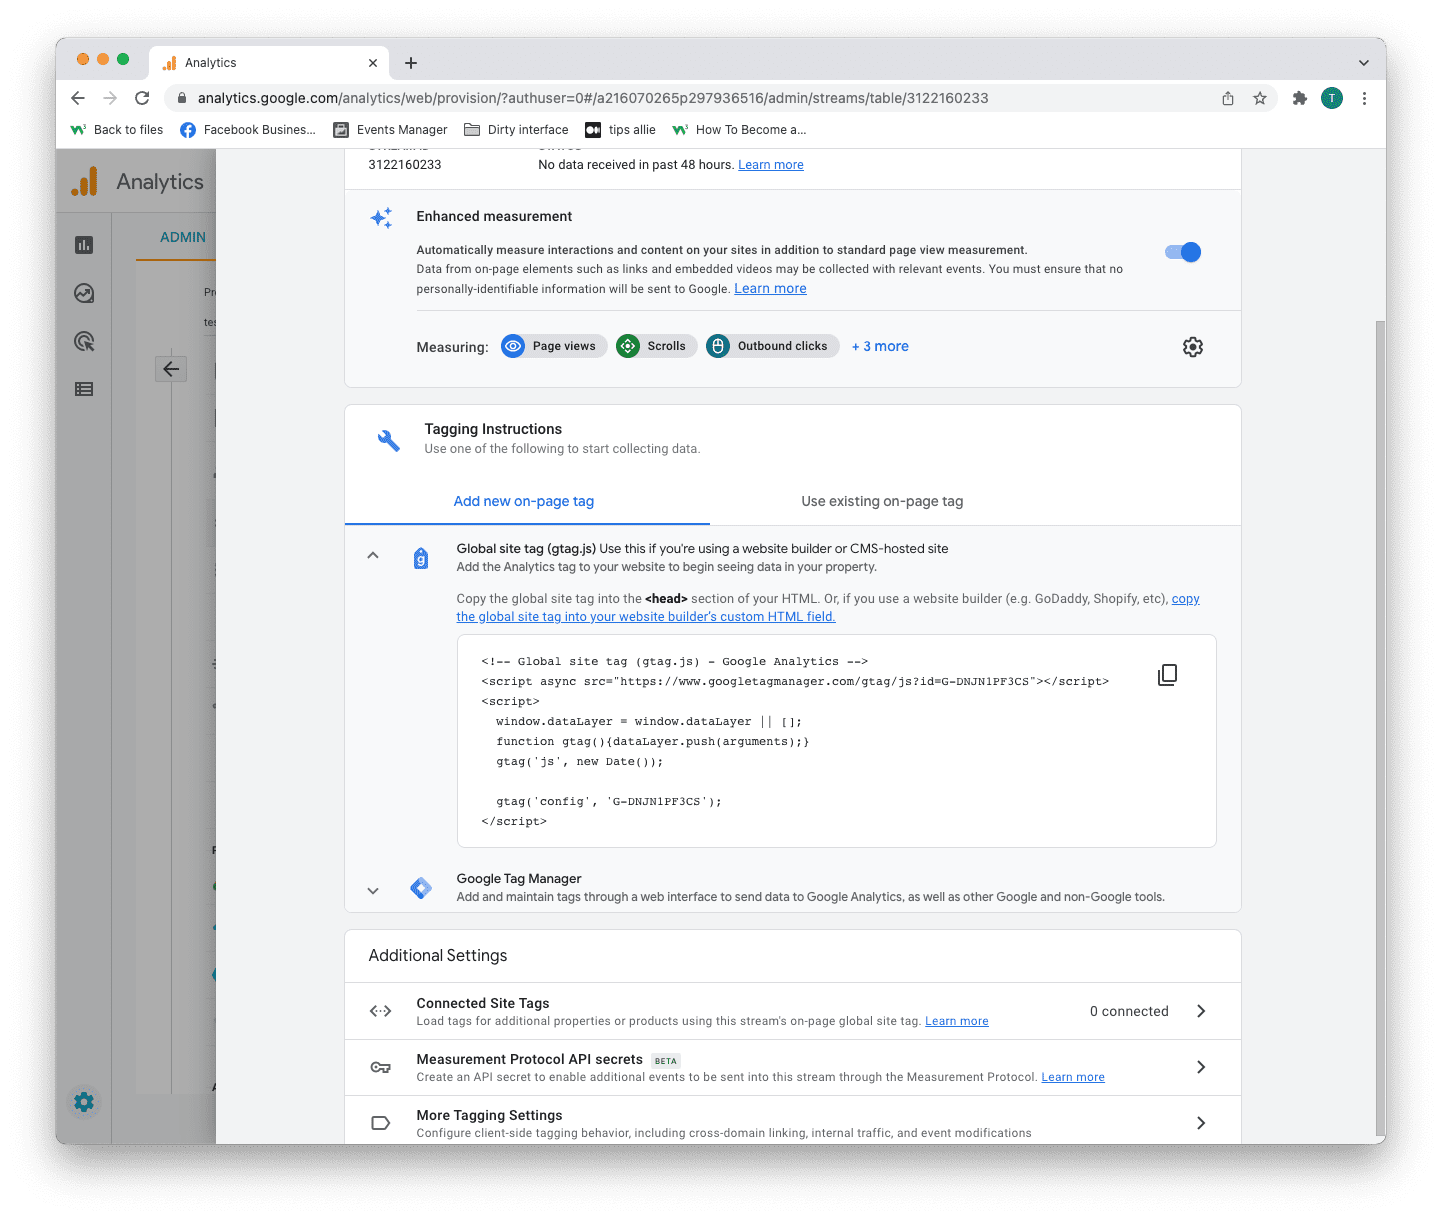
Here you can see a code snippet.
The code snippet is a script to allow Google to measure data on your site.
You can see the Measurement ID in the second last line in the code snippet.
The code snippet
<!-- Global site tag (gtag.js) - Google Analytics -->
<script async src="https://www.googletagmanager.com/gtag/js?id=G-DNJN1PF3CS"></script>
<script>
window.dataLayer = window.dataLayer || [];
function gtag(){dataLayer.push(arguments);}
gtag('js', new Date());
gtag('config', 'G-XXXXXXX');
</script>
Step 12: Enter the code snippet
Copy the code snippet.
Make sure to include your Measurement ID.
Locate the <head> tag in your HTML.
Paste the code snippet just below the <head> tag.
Save and publish the code.
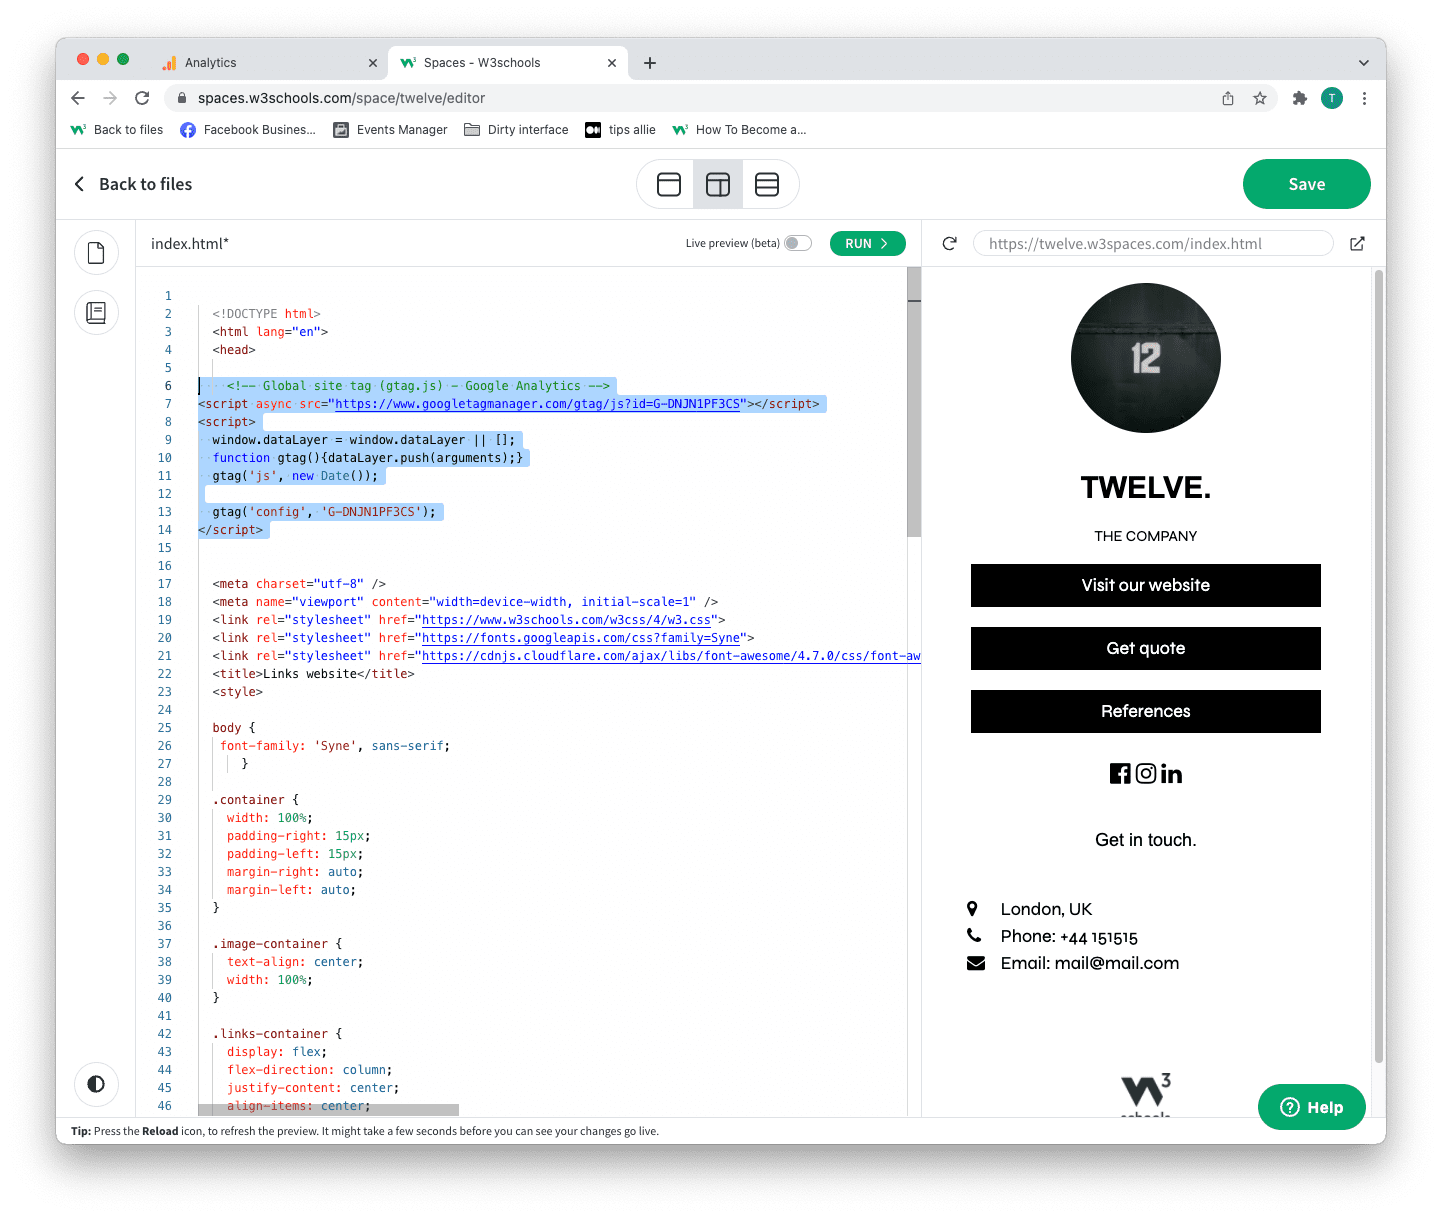
We used W3Schools Spaces in this example.
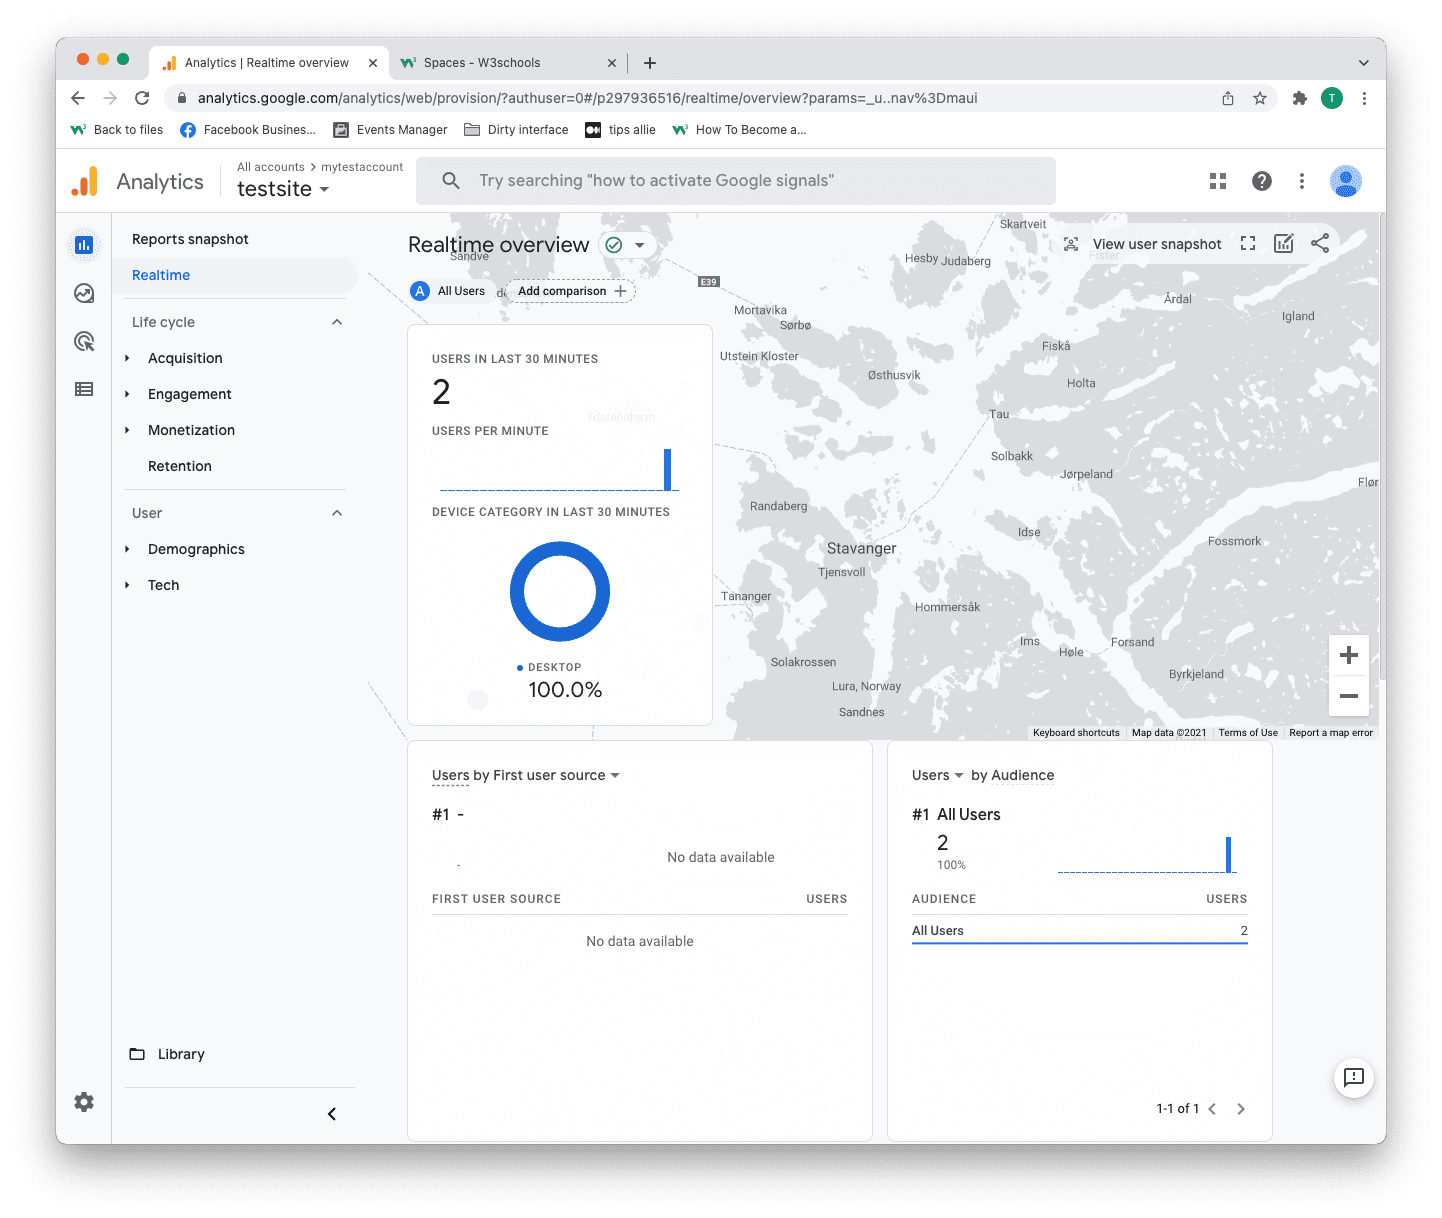
Step 13: Test that it works
Ensure that you have successfully saved and published the code snippet with the correct Measurement ID.
Open the URL for the site you have connected to the data stream.
Click on "Real time" on the menu to the left.
Confirm that you see yourself as an active user.
Congrats. You have successfully enabled Google Analytics for your site!
Explore Google Analytics
Recommended related topics are Tag manager and Events
Spend time in the service to learn about your user activity, commerce, demographics, device, and referrals.
Tip: Ever heard of W3Schools Spaces? It is a personal space where you can make a website from scratch or use a template and host it for free.
It has everything you need in the browser.
Get started in a few clicks.
Start now for free ❯* no credit card required