Come creare un portafoglio
Il portfolio è fondamentale per farsi notare.
Creare un portfolio è un buon modo per far crescere la tua presenza online.
Il portfolio viene utilizzato per mostrare le tue capacità e i tuoi progetti.
Può aiutarti a trovare un lavoro, un lavoro da libero professionista o uno stage.
Crea il mio portfolio gratuitamente »Che cos'è un portafoglio
Il portfolio può avere lo stesso scopo di un CV. La maggior parte dei CV sono scritti con il testo, mentre il portfolio è per la presentazione, quindi è visivo con immagini e spesso più dettagliato del CV.
È un luogo in cui puoi mostrare la tua esperienza lavorativa e mostrare i progetti di cui sei più orgoglioso.
Il tuo portafoglio online può essere condiviso con il suo link ad aziende, responsabili delle assunzioni e reclutatori, in modo che possano notarti.
Si tratta di mostrare e dare agli altri una comprensione di chi sei come professionista.
Perché creare un portfolio
È un ottimo modo per far crescere la tua presenza online e farti notare.
Può essere utilizzato per ottenere un lavoro o per attirare clienti verso i tuoi servizi.
Averlo online come sito web. Consente alle persone di tutto il mondo di trovarti.
Il design del portfolio darà al lettore un'idea di chi sei. Assicurati che appaia in un modo buono e presentabile!
Per chi è un portfolio
La creazione di un portfolio può essere importante per la tua carriera.
Può essere utile quando cerchi un lavoro, un lavoro da freelance o mostri le tue abilità a un nuovo cliente.
I ruoli tipici che utilizzano i portafogli sono professionisti quali, a titolo esemplificativo ma non esaustivo:
- Sviluppatori di software
- UX designer
- Grafici
- Fotografi
- Professionisti del marketing
- Architetti
- Scrittori
Mai sentito parlare di W3Schools Spaces ? Qui puoi creare il tuo portfolio da zero o utilizzare un modello e ospitarlo gratuitamente.
Inizia gratuitamente ❯* nessuna carta di credito richiesta
Quali sono le sezioni più importanti in un portfolio
Ci sono molti modi diversi per creare un portfolio.
Come crearlo dipende dal tipo di professionista che sei, per chi lo stai costruendo e perché lo stai creando.
Devi testare, fallire e imparare a scoprire quale tipo di portafoglio è giusto per te!
Ci sono alcune sezioni che sono essenziali per tutti i tipi di portafogli, riassunte di seguito:
1. Sezione Eroe.
La sezione degli eroi è la prima cosa che le persone vedono quando entrano nel tuo portfolio.
Viene visualizzato sotto il tuo logo e menu.
La sezione dell'eroe aiuta il lettore a capire cosa offri, perché qualcuno dovrebbe lavorare con te e il valore che offri con i tuoi servizi.
Spesso contiene un pulsante di invito all'azione come "contattami", "prenota una riunione" o simili.
2. Sezione Chi sono.
Fornisci al lettore un breve riassunto su di te.
Includi argomenti come la tua istruzione, esperienza lavorativa, progetti e interessi.
Aiuta il lettore a capire ciò che ti appassiona e i tuoi superpoteri (le cose in cui sei veramente bravo).
Ricorda di mantenerlo breve e semplice.
3. Sezione Progetti.
Elenca i progetti su cui hai lavorato. Il modo più utilizzato è ordinare l'elenco per data, ma in alcuni casi può avere senso ordinarlo in un altro modo logico.
Aggiungi dettagli a ogni progetto, che include il tuo ruolo, cosa hai fatto e come è andato a finire il progetto.
L'aggiunta di immagini per mostrare ciò che hai costruito è un vantaggio! Metti in mostra le cose di cui sei orgoglioso.
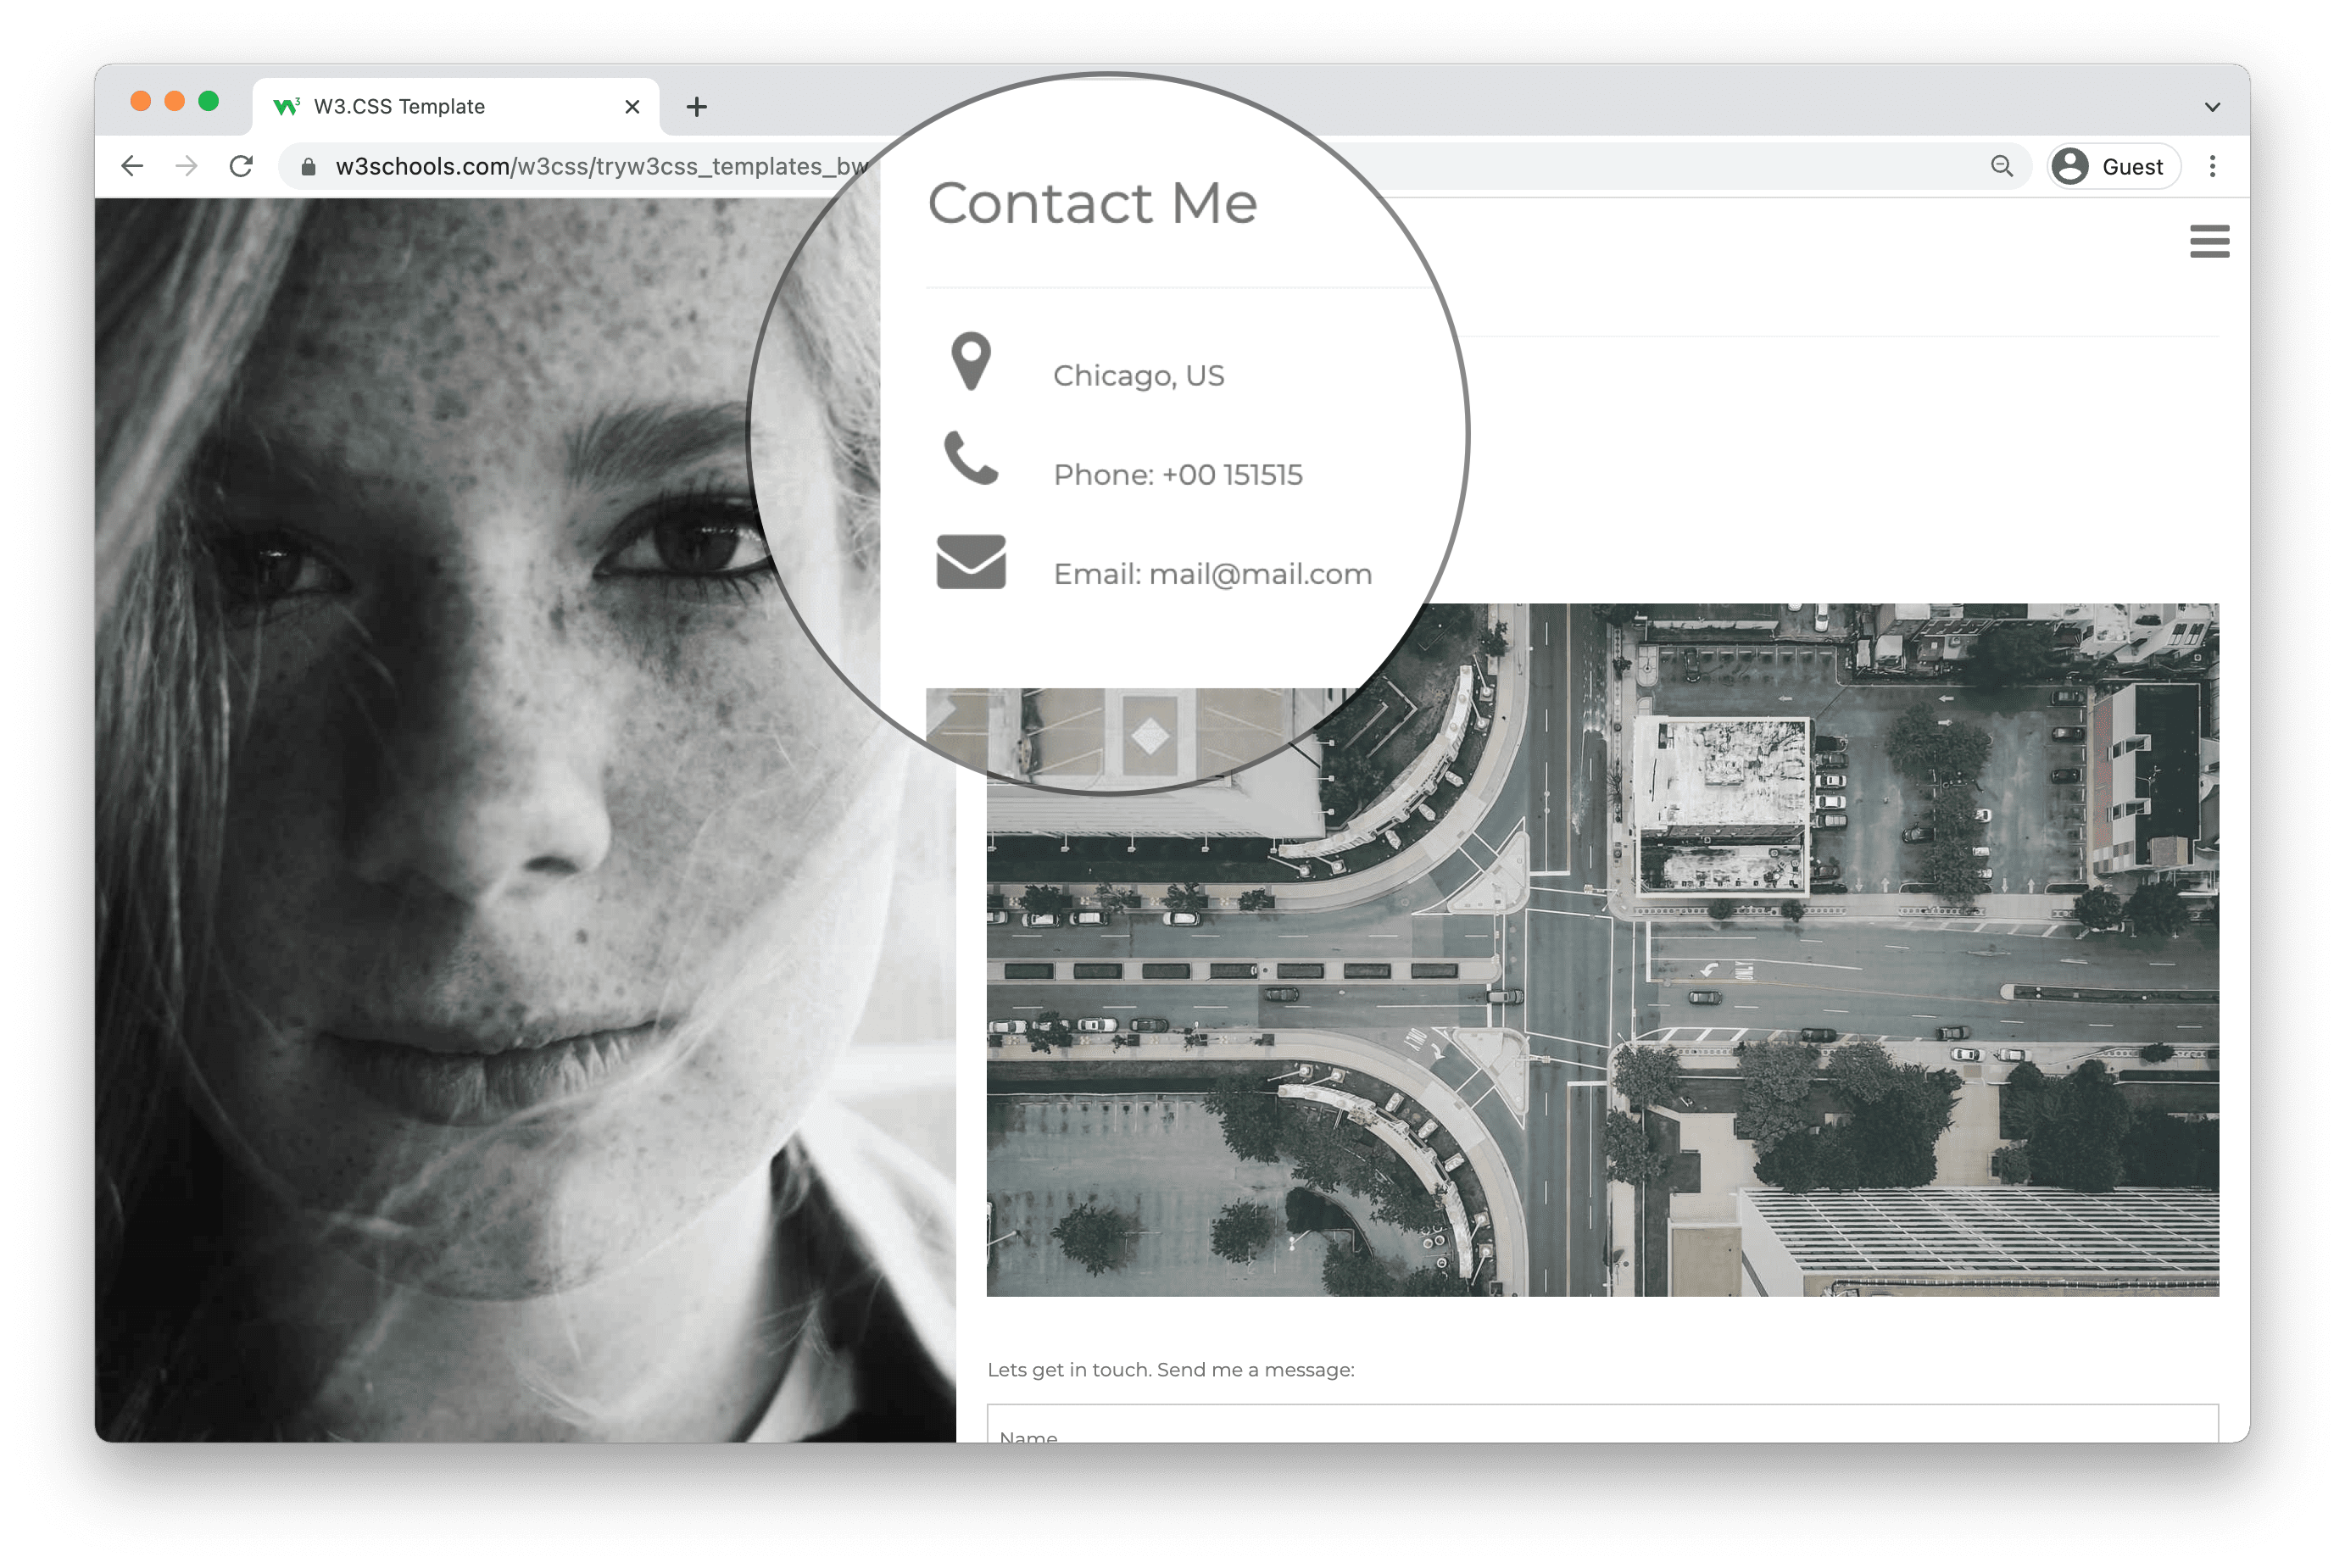
4. Sezione contattami.
Fai sapere al lettore come e dove può mettersi in contatto con te.
Aggiungi i tuoi dettagli di contatto e altri canali di contatto come il tuo profilo GitHub, LinkedIn, Youtube e così via.
Esempi di portafoglio
Dai un'occhiata ad alcuni esempi di portfolio.
Puoi caricare i modelli di portfolio in W3Schools Spaces . Inizia a pubblicare il tuo portfolio in pochi clic.
Pubblica il mio portfolio gratuitamente ❯* nessuna carta di credito richiesta
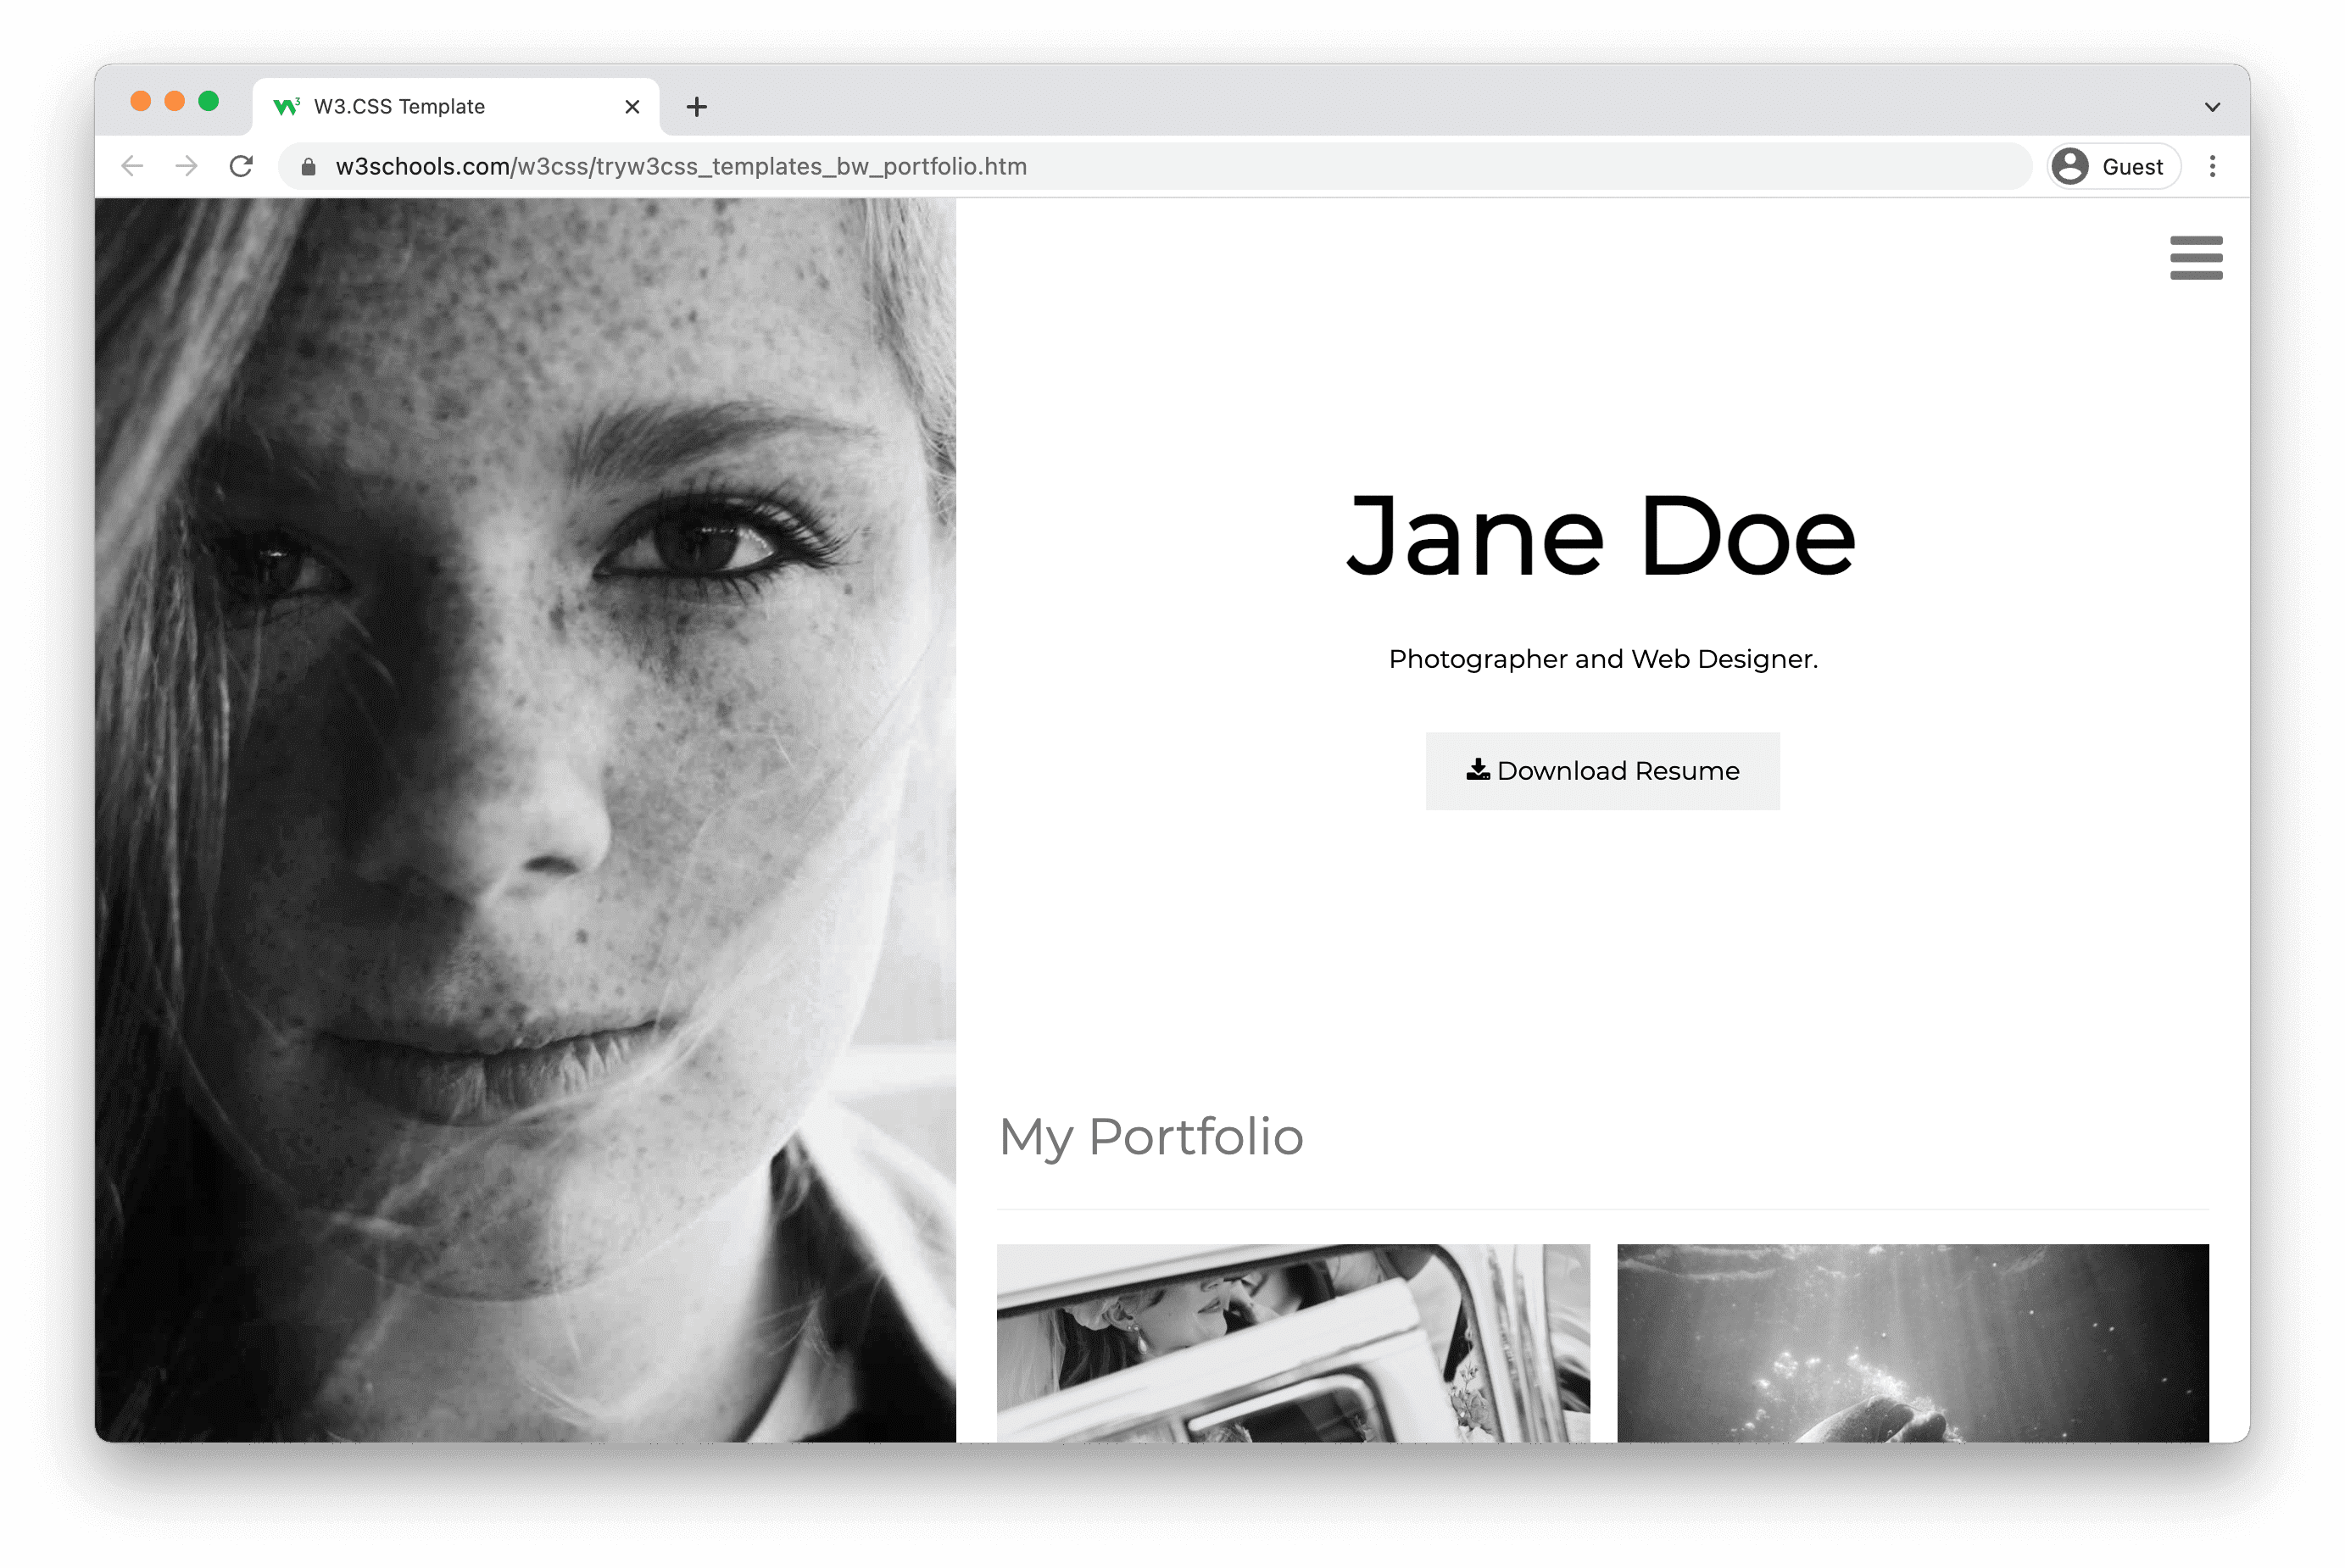
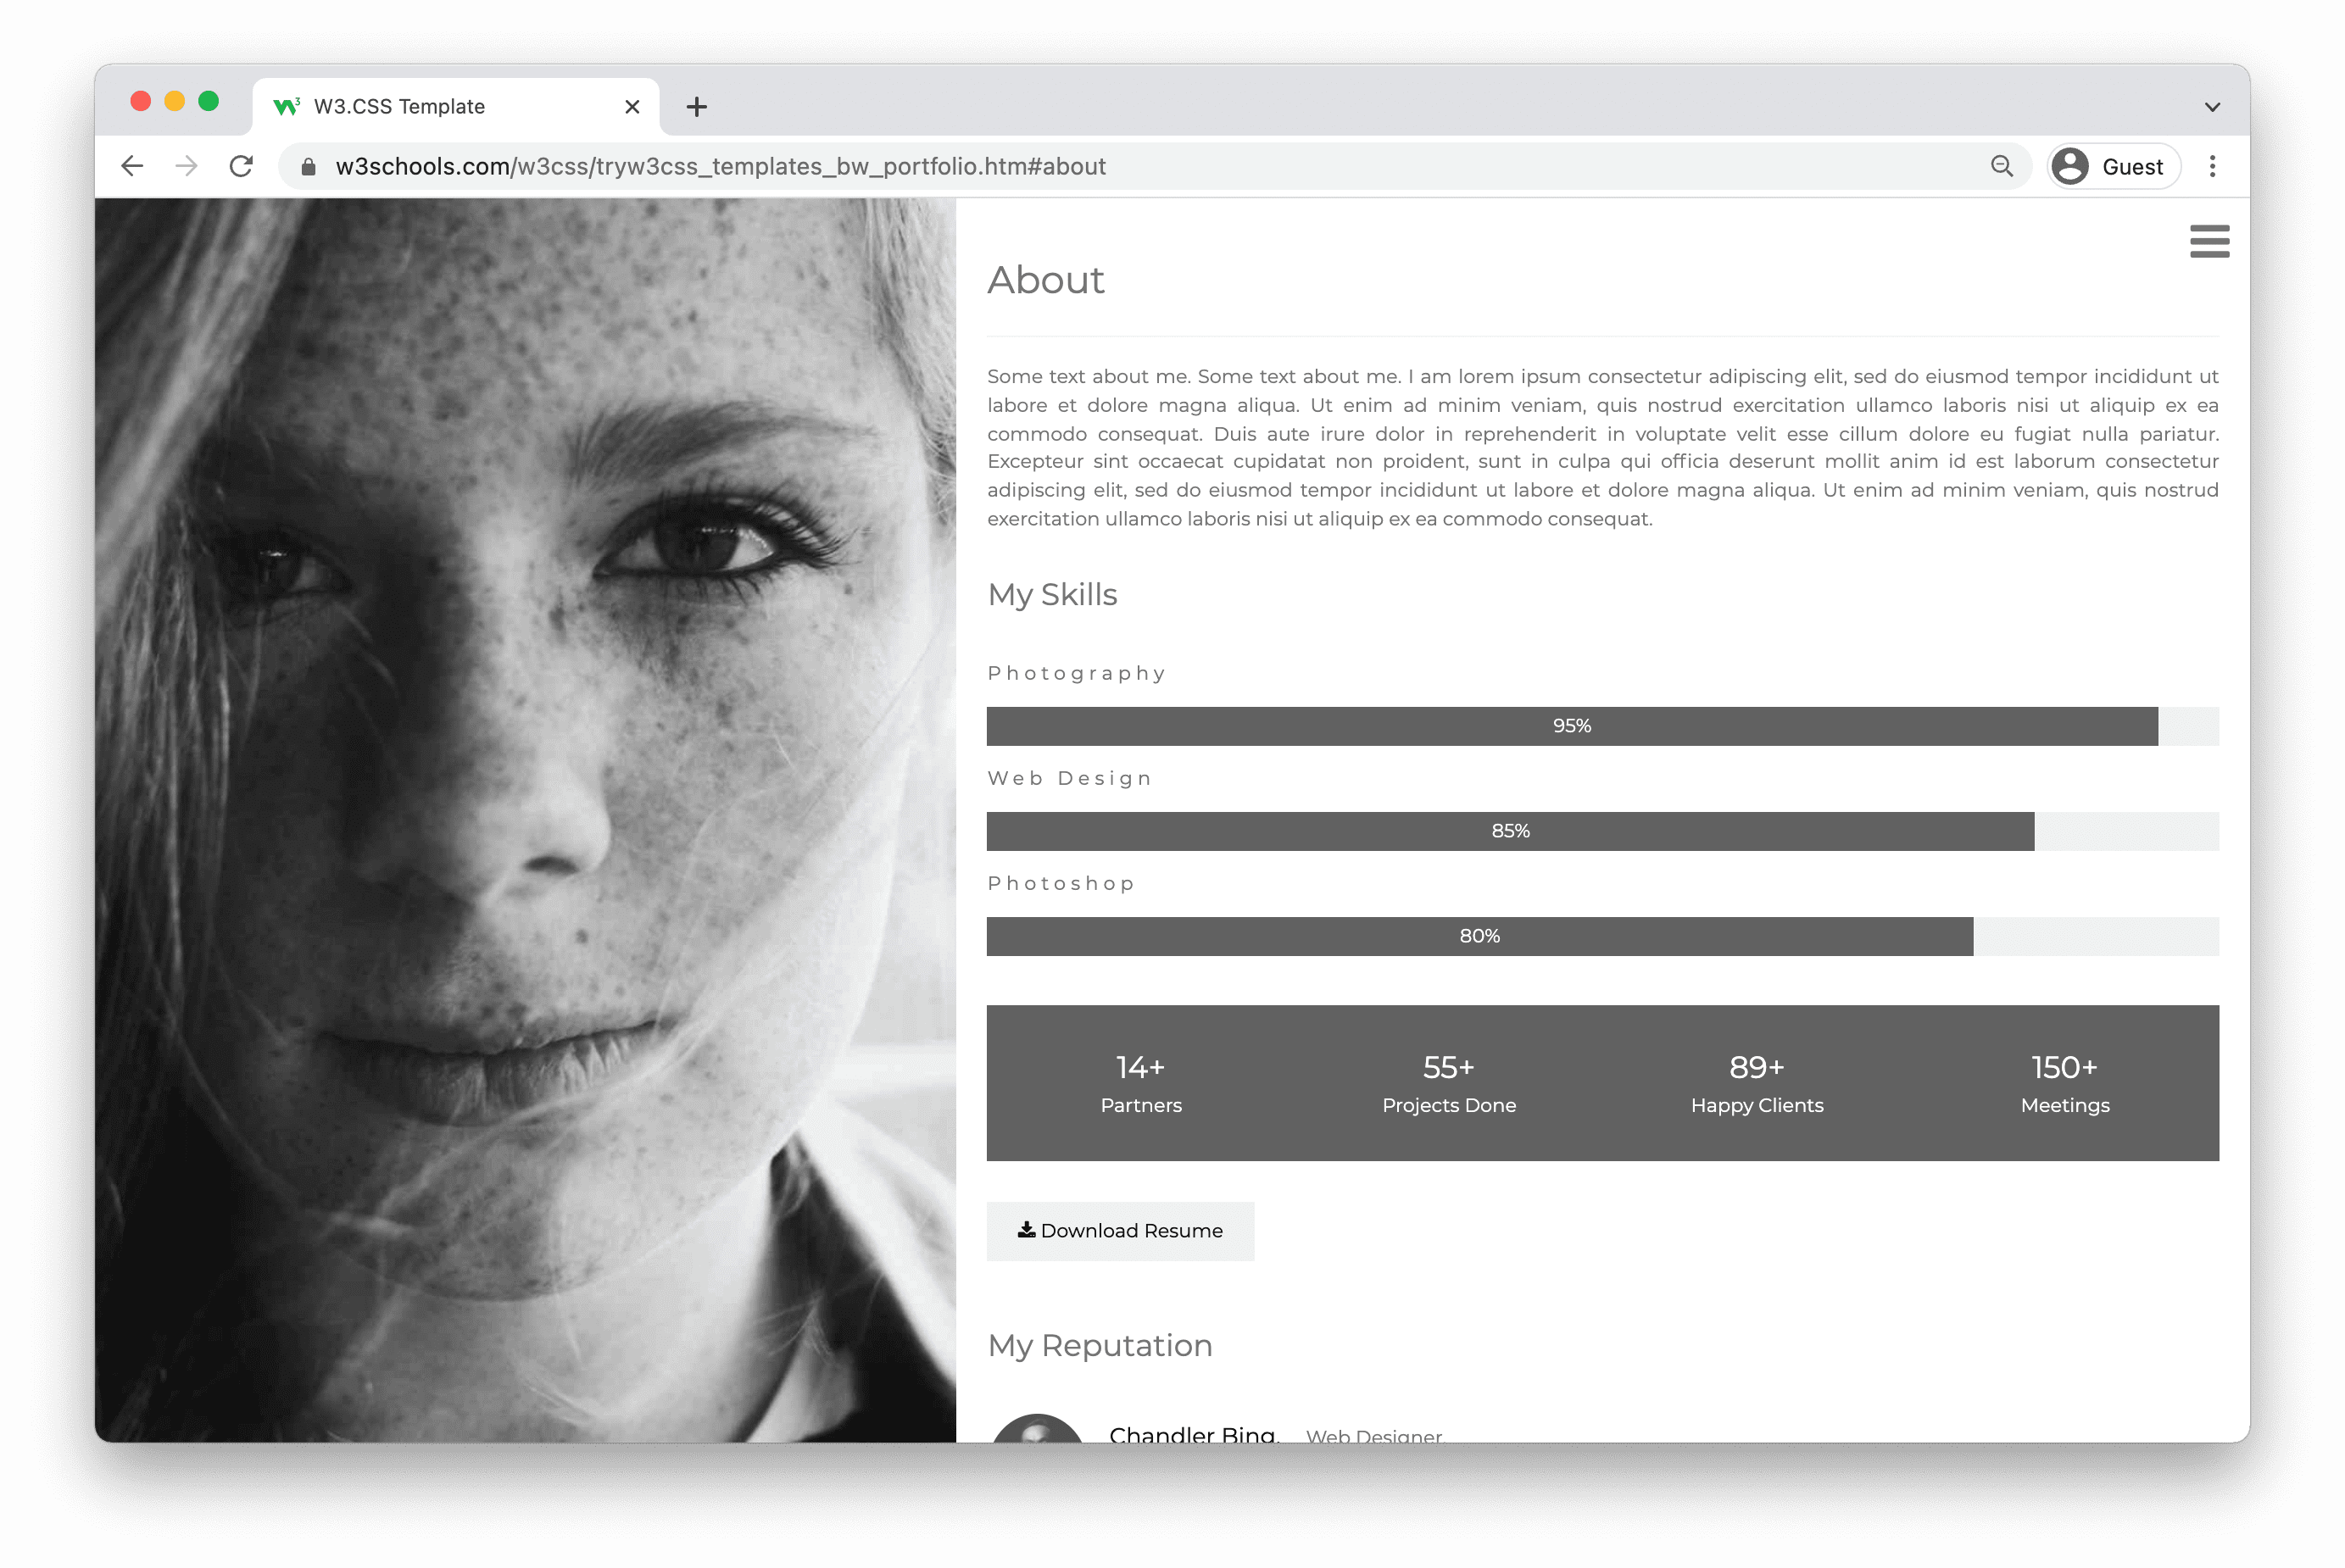
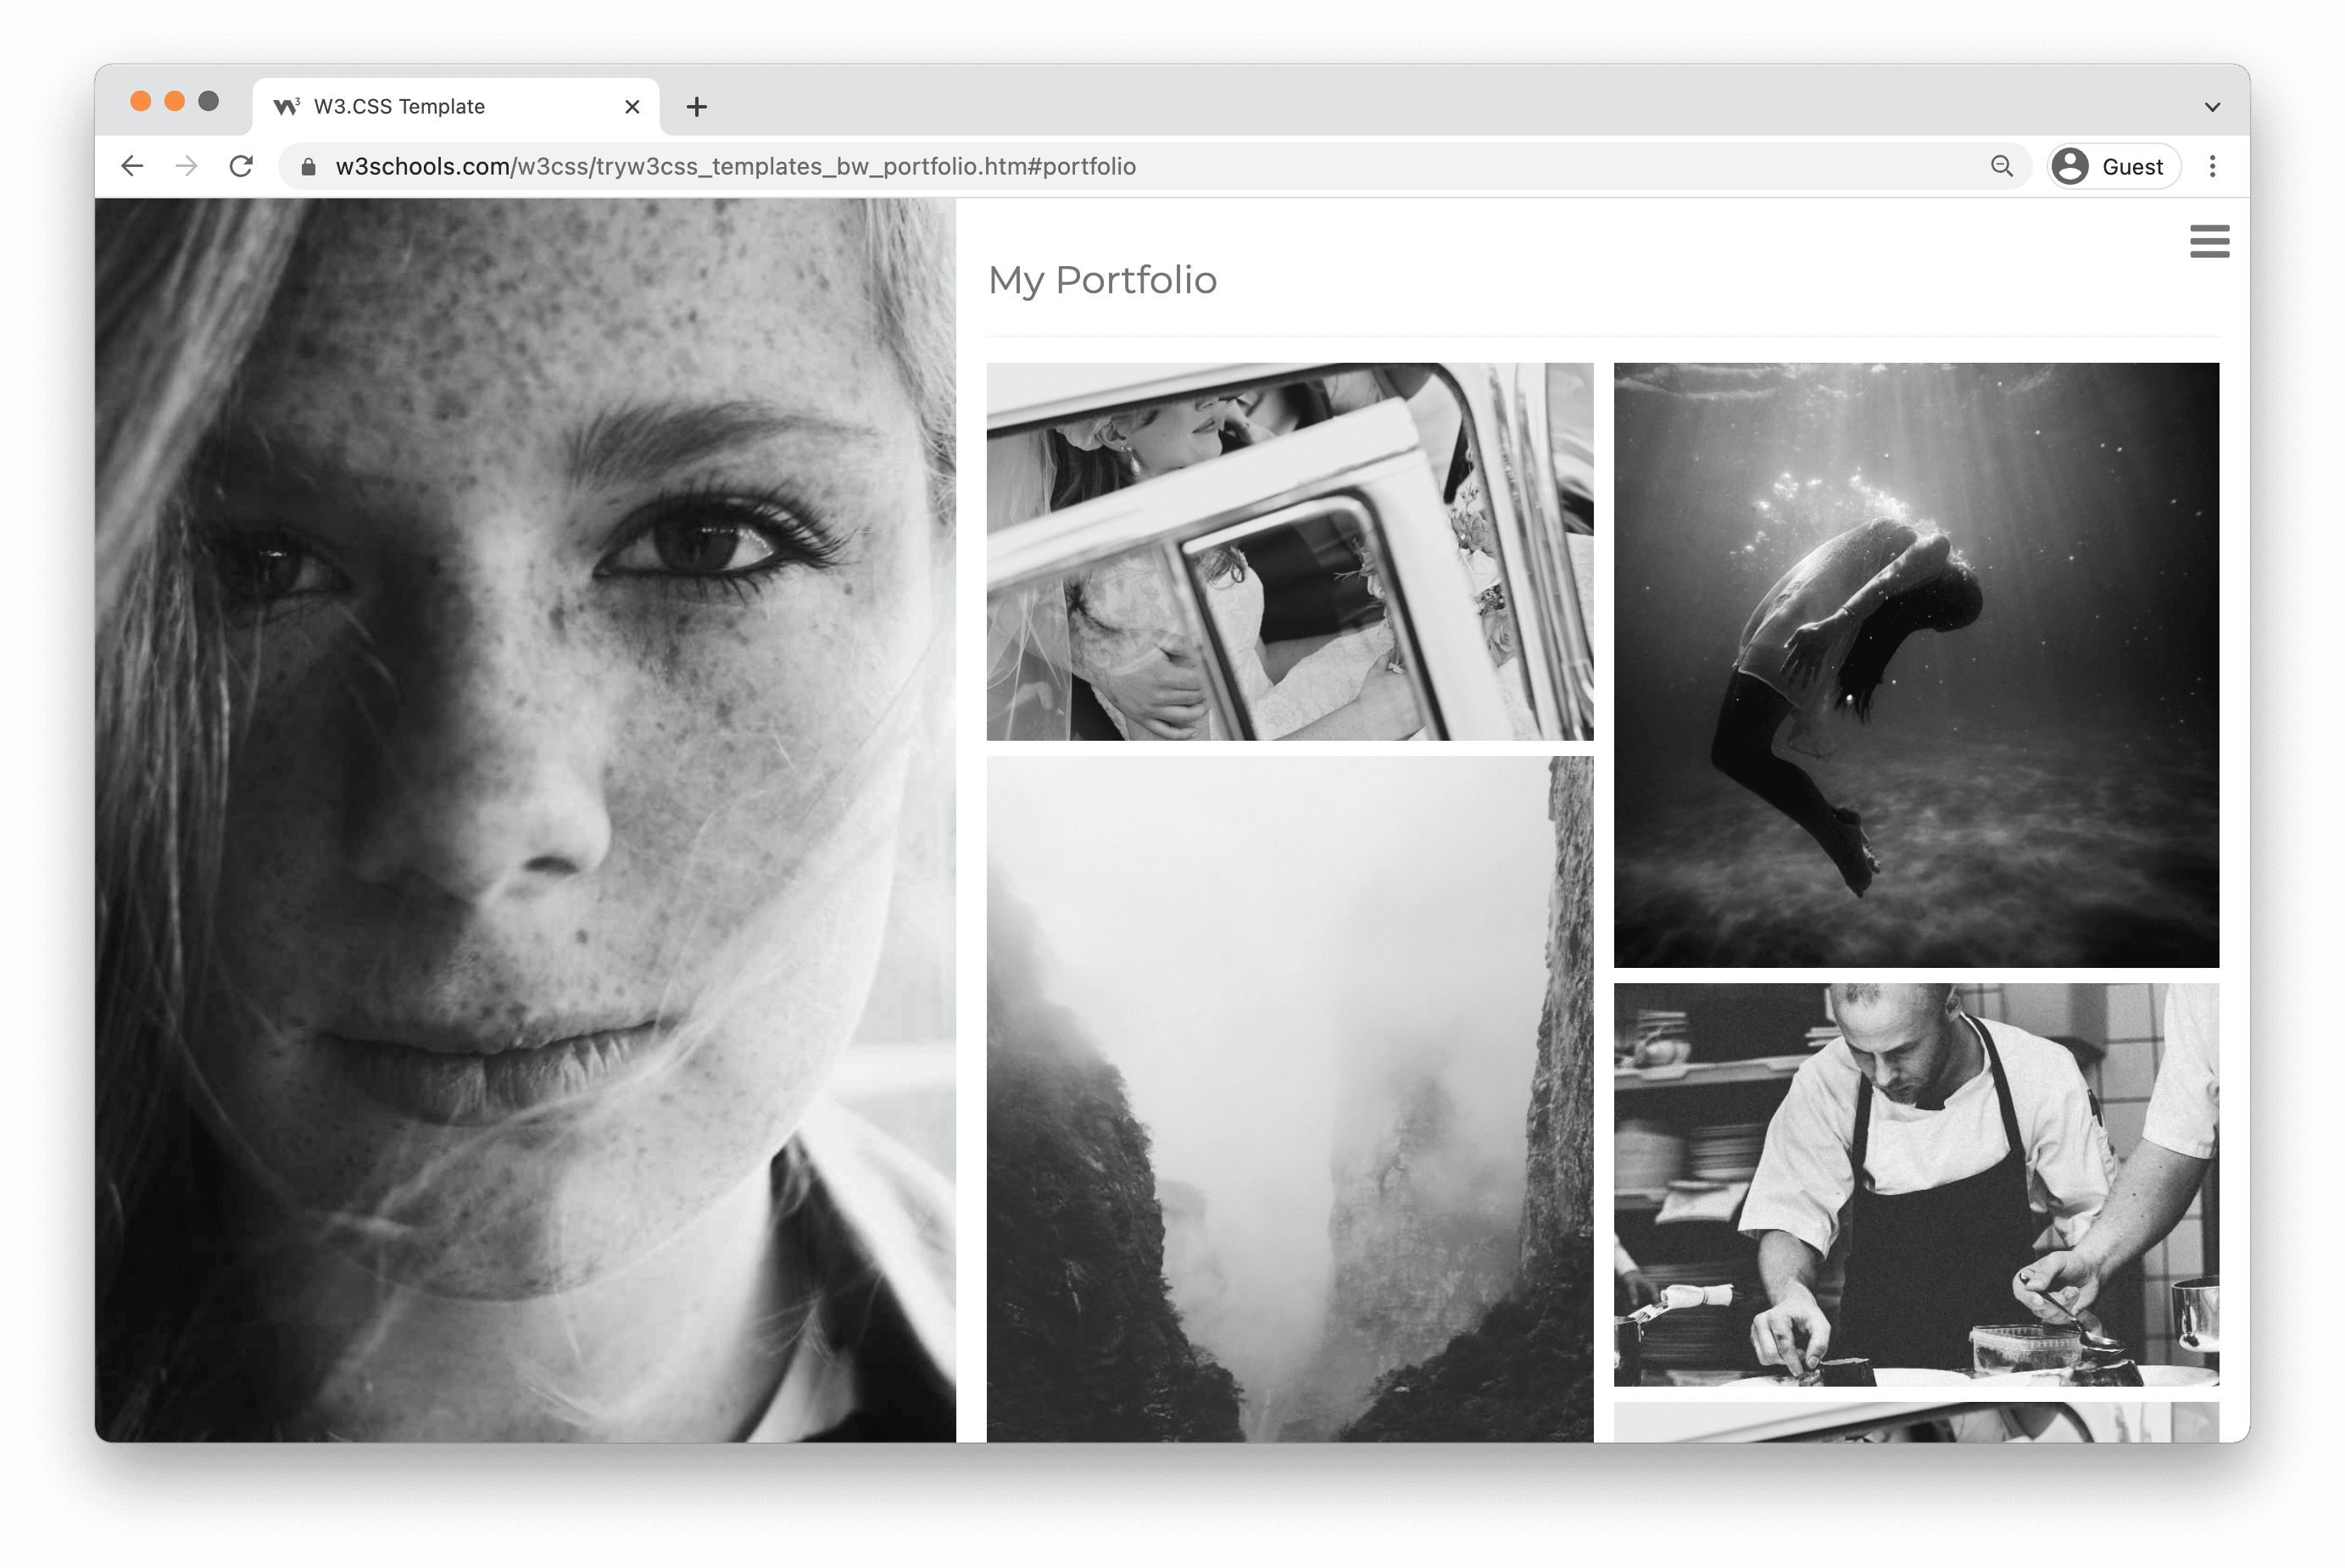
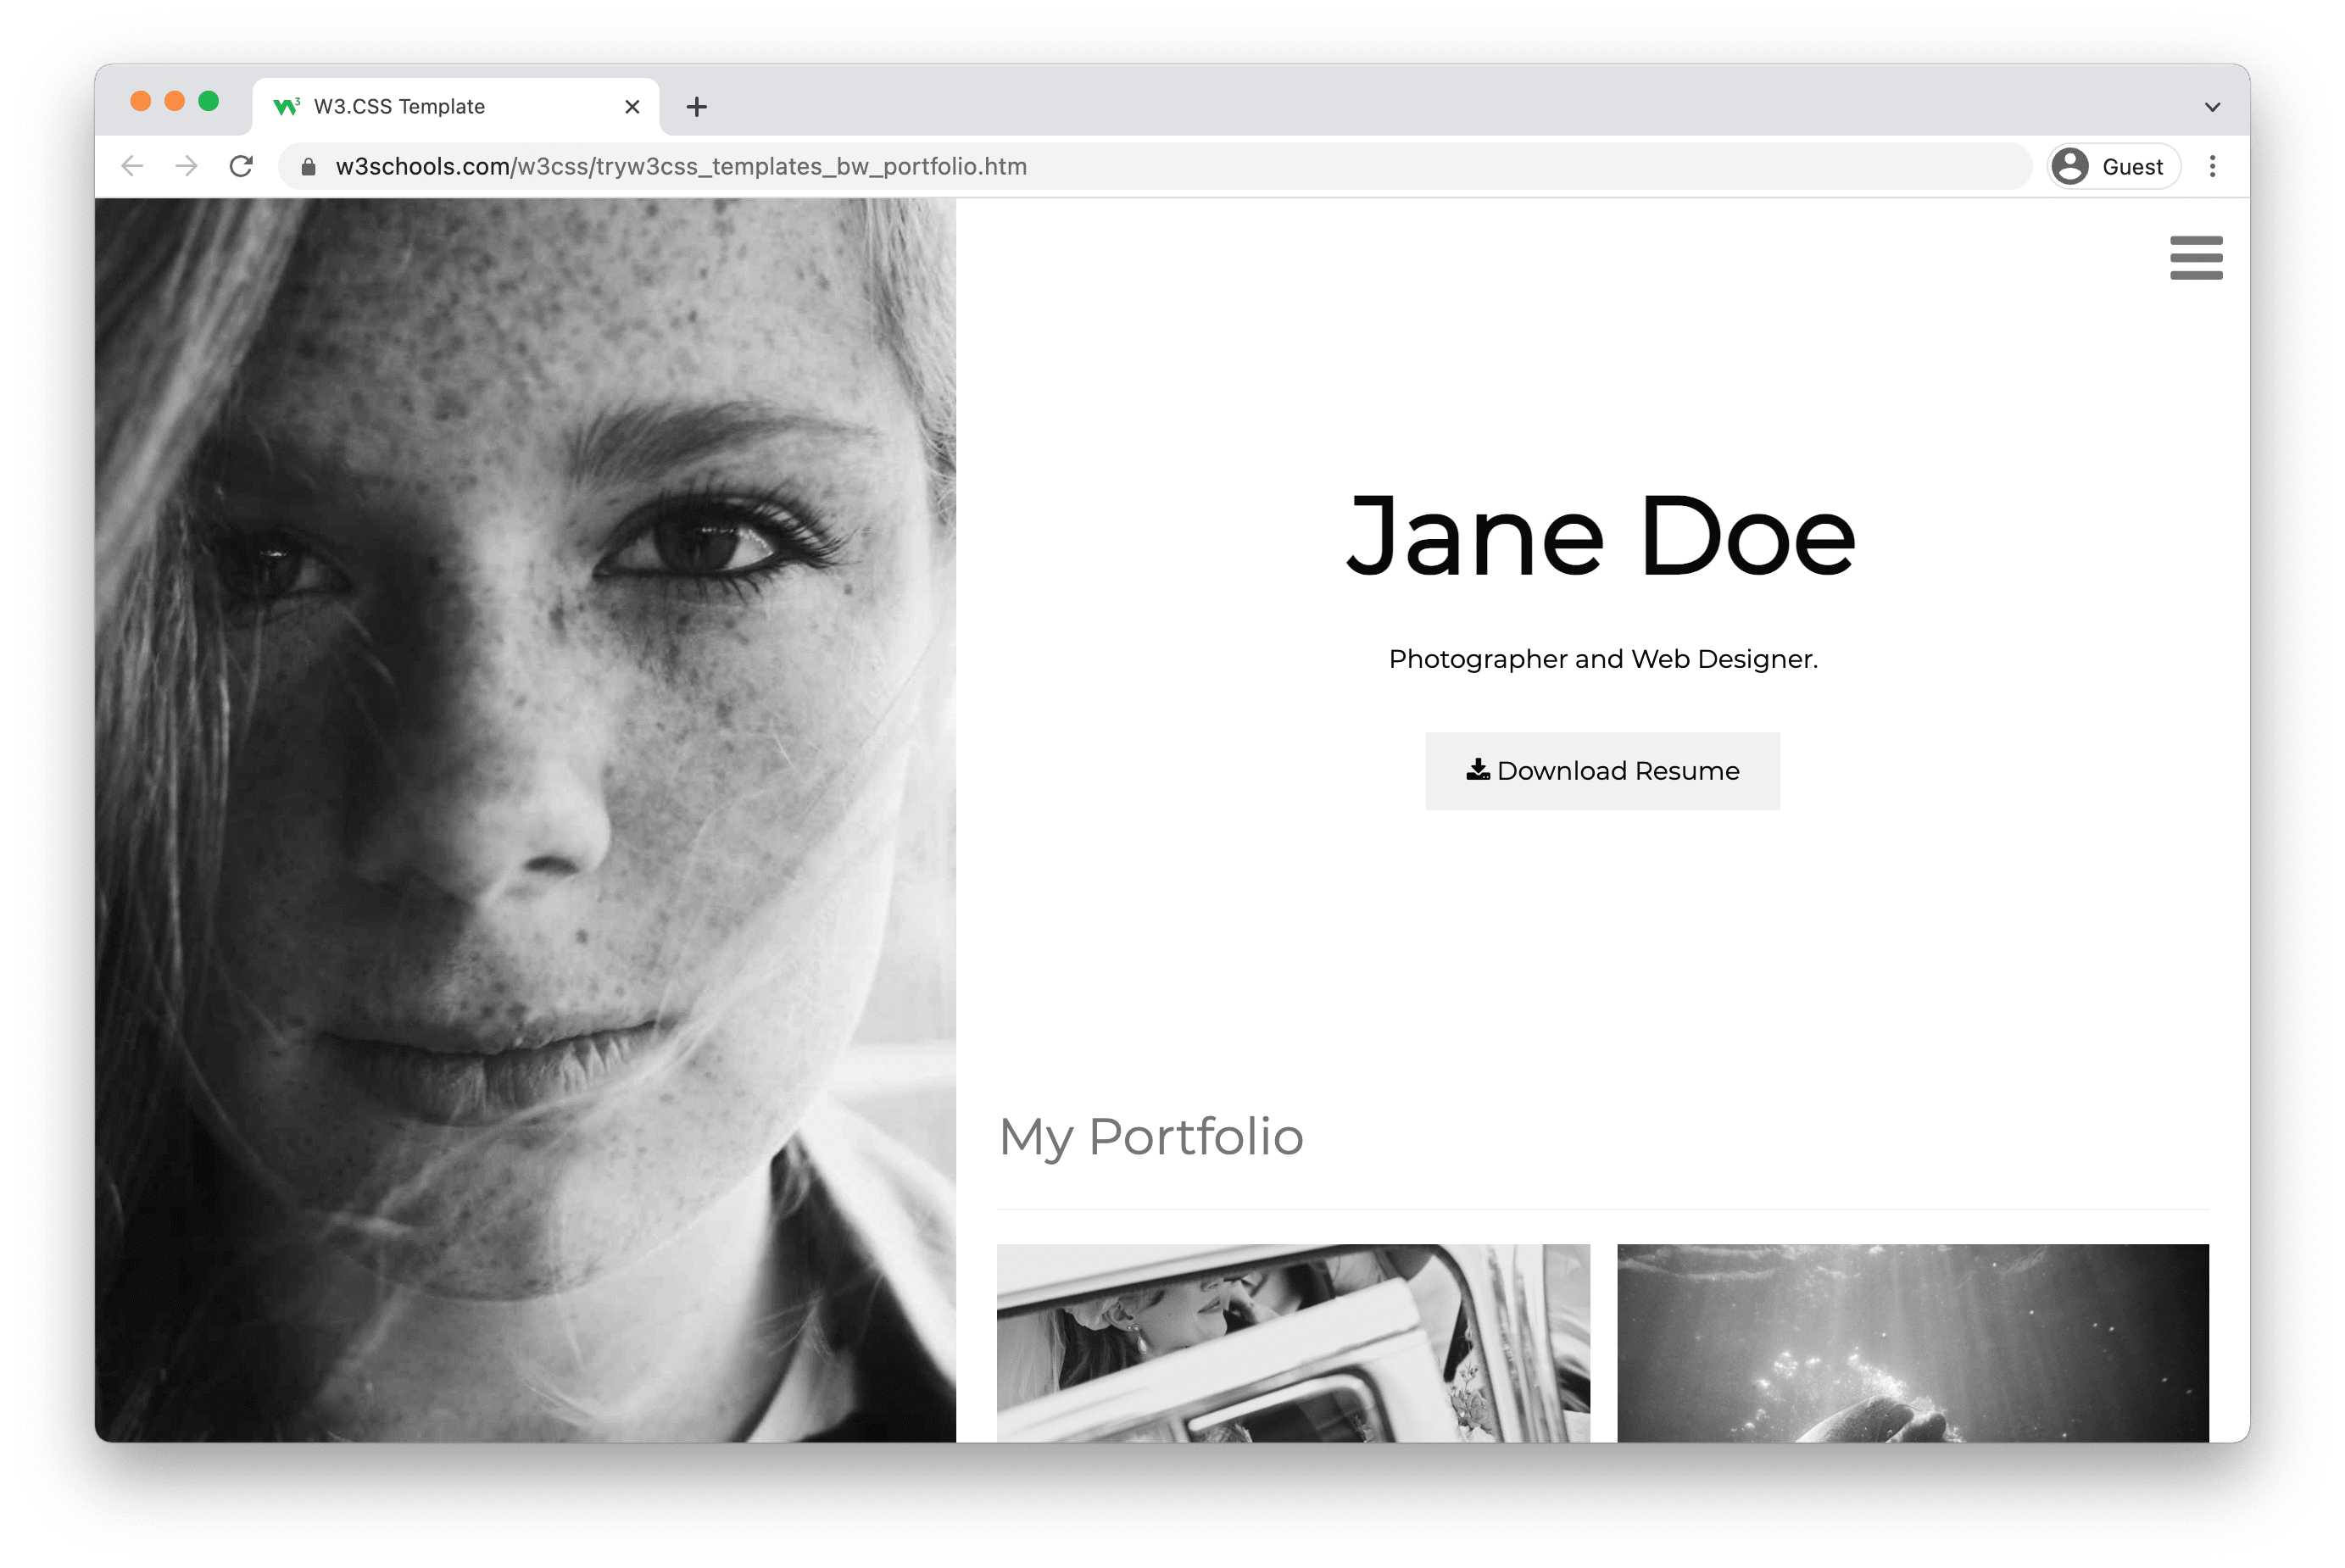
Modello di portafoglio in bianco e nero
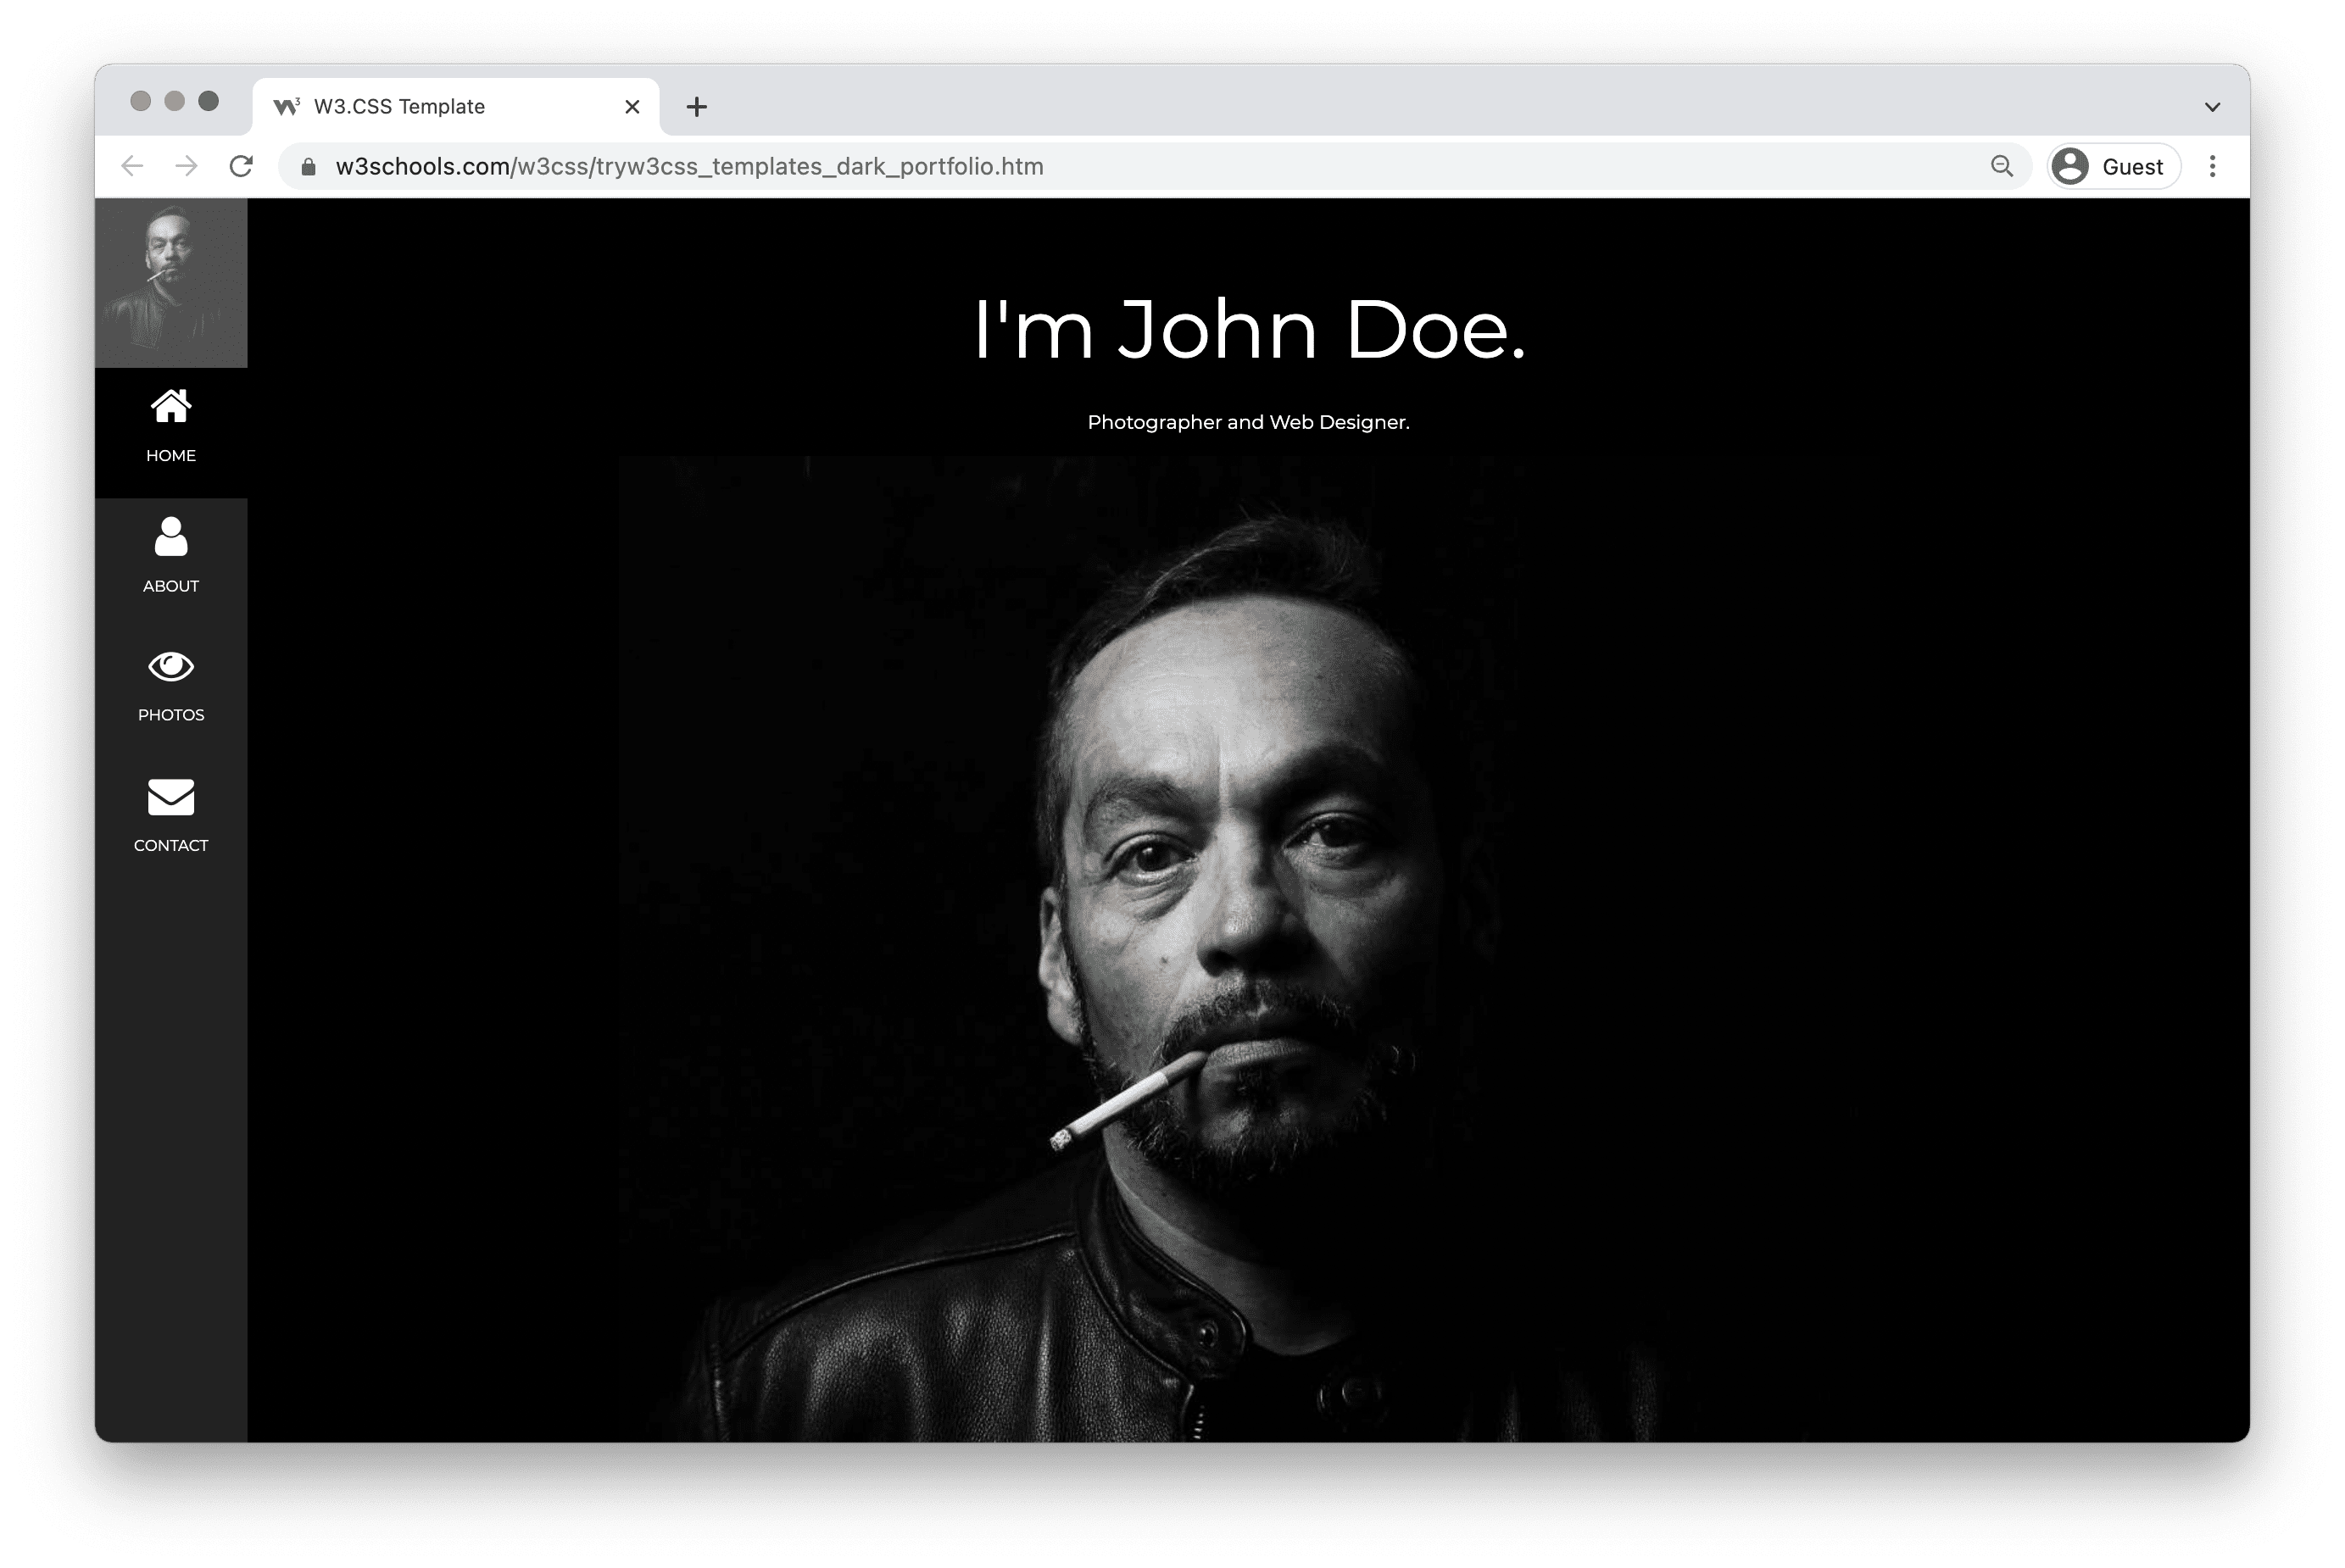
Dark Portfolio Template
People Portfolio

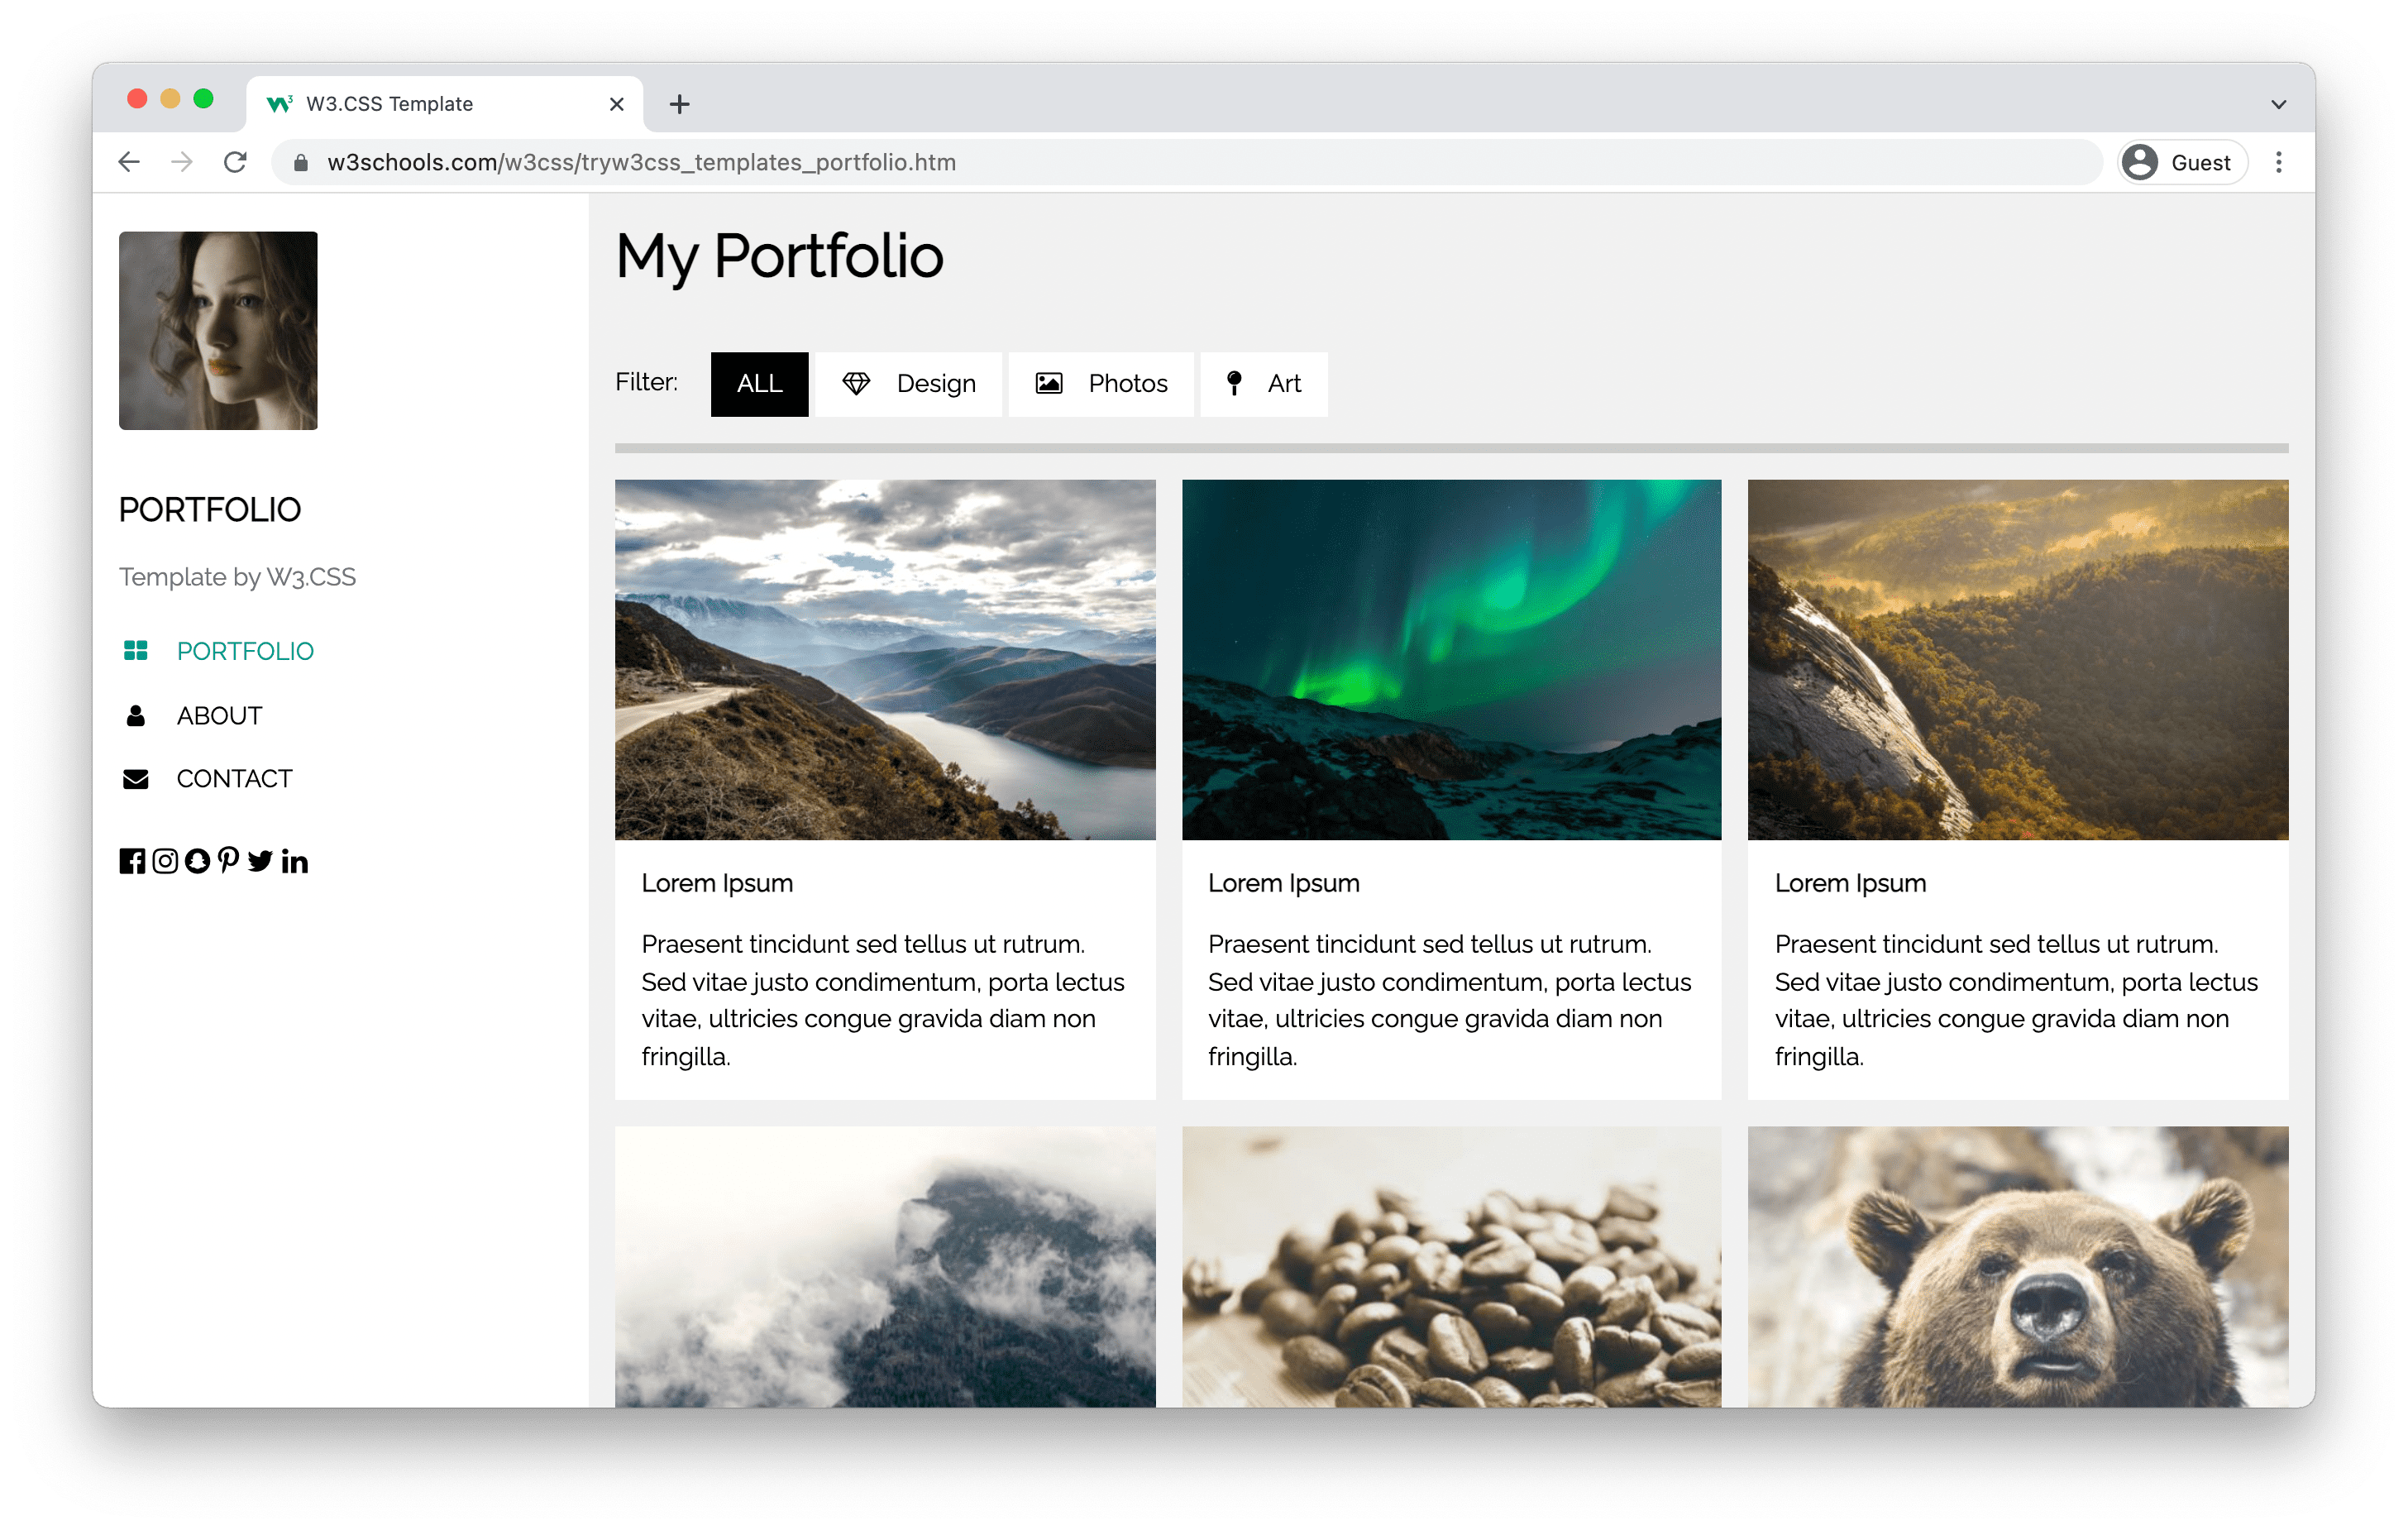
My Portfolio Template
What do I need to know to create my own portfolio?
HTML, CSS and JavaScript are the foundational languages to create a website.
You can come a long way just using these three!
- Create the structure with HTML. The first thing you have to learn, is HTML, which is the standard markup language for creating web pages. Learn HTML ❯
- Style with CSS. The next step is to learn CSS, to set the layout of your web page with beautiful colors, fonts, and much more. Learn CSS ❯
- Make it interactive with JavaScript. After studying HTML and CSS, you should learn JavaScript to create dynamic and interactive web pages for your users. Learn JavaScript ❯
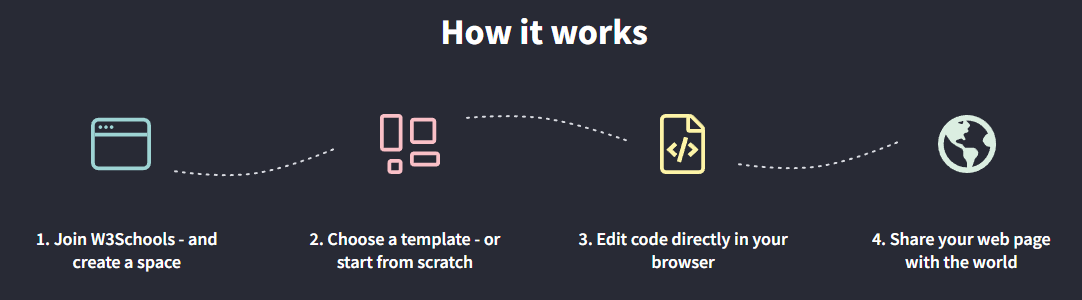
How to create a portfolio step-by-step
Follow the steps to create your portfolio from the ground up.
Preparations
Decide which code editor to use and set up your environment.
W3Schools has created an easy to use code editor called W3Schools Spaces. Sign up and get started in a few clicks.
Start for free ❯Create your index.html file. So that you are ready to enter the code.
All set up. Lets go!
Step One: Add HTML Skeleton
Type an HTML skeleton code, which is the starting point for your website. It is the structure which holds the code and ensures that it is properly displayed on the internet.
Read here for how to create a basic HTML Skeleton: How to create a HTML Skeleton
Step Two: Add Navigation Bar
The navigation bar is a short representation of the content on the website.
It is one of the first things that a visitor will see.
It helps the visitors to find and navigate through the content on website. It is important to create well-structured navigation. So that your visitors can find what they are looking for.
Here is an example of how to create a top navigation bar: How to create a Top Navigation Bar
Step Three: Add Hero section
The Hero section, together with the navigation bar, is the first section of your portfolio that people will see.
It should contain short information about several things such as:
- Who are you?
- What do you offer?
- What is your profession?
- Why should people work with you?
- Which actions should you take?
Write in first-person and keep it short and simple.
Additional things preferred in the hero section are:
- Eye-catching graphics, either as a background or side-by-side with the text.
- An action button that leads to content on your portfolio or to the content of another website.
Here is an example on how to create a Hero section: How to create a Hero image
Step Four: Add About Me section
In this section, you can get creative. This can help you to to stand out.
Here you can personalize the content and write about yourself more in-depth.
The content you can include in this section is:
- Your introduction
- Who are you as a professional
- Your education
- Your skills
- Your work experience (present and/or past)
- Your hobbies
- Your goals and ambitions
In a way, you can consider the "About me" section as a short summary of your CV.
Feel free to write about yourself in first person.
Personalization and making people understand you as a person might bring you more attention.
Here is an example on how to create an about me section: How to create an About Me section
Step Five: Add Work Experience section
The work experience section highlights the experience, knowledge, and competence that you have made along your way.
Here you can add:
- Links to your projects with the project name and/or short description of what the project is about.
- Links to blog posts that you have written with title and/or short description about what it is about.
- Your professional awards or achievements.
- Highlighting your work and your accomplishments is a way to create opportunities for yourself.
- Visual representations such as images or graphics.
Step Six: Add Contact section
The contact section is the section that lets your visitor get in touch with you.
You should always include a way for visitors to contact you, either through a contact form or by writing down your contact information such as:
- Address
- Phone number
- E.g. Github profile, LinkedIn profile, Youtube profile and so on.
Here is an example on how to create a basic contact section: How to create a Contact section
Step Seven: Add Footer section
The footer can be experienced as a minor section, but it is an important one of every website.
It is about showing critical information based on your website goals and the needs of your visitors.
Often it contains technical information about copyright, but it can hold other information, such as:
- Link to "Privacy policy" page
- Link to "Terms of use" page
- Contact information
- Website navigation links
- Links to social networks
- Link to your shop
Here is an example on how to build a footer section: How to create a Footer section